
Netty is an asynchronous event-driven network application framework for rapid development of maintainable high performance protocol servers & clients.
Netty特性总览
Netty是一个基于NIO的服务端/客户端框架,整体的架构设计如下:
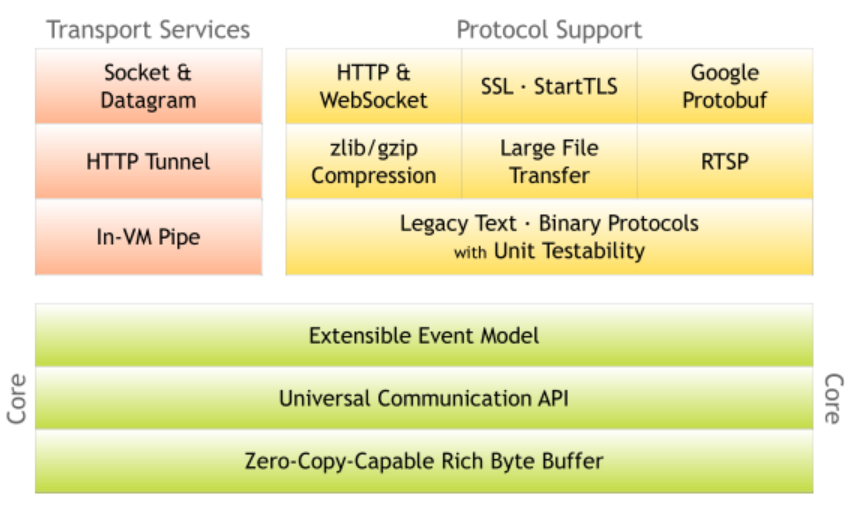
Netty特点
作用
- 做为RPC网络通讯框架,实现远程过程调用
- 做为长连接的服务器
- 做为Http的服务器
良好的设计
- 对于阻塞和非阻塞模型提供了统一的API
- 具有灵活、可扩展的模型
- 提供高度可定制的线程模型,例如单线程或者线程池(SEDA)
- 支持实现真正的无连接的socket协议
使用简单
- 完善的Javadoc以及示例
- 支持JDK5及以上版本
性能
- 更高的吞吐量,更低的延迟
- 功耗更小
- 将不必要的资源拷贝降到最低(零拷贝技术)
安全
支持SSL/TLS
Netty架构实现
Netty的Hello world
定义好服务器端相关代码:
public class TestServer {
    public static void main(String[] args) throws InterruptedException {
        // 1.接收请求
        EventLoopGroup bossGroup = new NioEventLoopGroup();
        // 2.处理请求
        EventLoopGroup workerGroup = new NioEventLoopGroup();
        try {
            // 启动服务端的类,对启动Netty做的封装
            ServerBootstrap serverBootstrap = new ServerBootstrap();
            serverBootstrap.group(bossGroup, workerGroup).channel(NioServerSocketChannel.class)
                    .childHandler(new TestServerInitializer());
            ChannelFuture channelFuture = serverBootstrap.bind(8899).sync();
            channelFuture.channel().closeFuture().sync();
        } finally {
            bossGroup.shutdownGracefully();
            workerGroup.shutdownGracefully();
        }
    }
}
定义好初始化器:
public class TestServerInitializer extends ChannelInitializer<SocketChannel> {
    @Override
    protected void initChannel(SocketChannel ch) throws Exception {
        ChannelPipeline pipeline = ch.pipeline();
        // 注意不要使用单例对象
        pipeline.addLast("httpServerCodec", new HttpServerCodec());
        pipeline.addLast("testHttpServerHandler",new TestHttpServerHandler());
    }
}
定义好处理器:
public class TestHttpServerHandler extends SimpleChannelInboundHandler<HttpObject> {
    @Override
    protected void channelRead0(ChannelHandlerContext ctx, HttpObject msg) throws Exception {
        if (msg instanceof HttpRequest) {
            ByteBuf content = Unpooled.copiedBuffer("hello world", CharsetUtil.UTF_8);
            FullHttpResponse response = new DefaultFullHttpResponse(HttpVersion.HTTP_1_1,
                    HttpResponseStatus.OK, content);
            response.headers().set(HttpHeaderNames.CONTENT_TYPE, "text/plain");
            response.headers().set(HttpHeaderNames.CONTENT_LENGTH, content.readableBytes());
            ctx.writeAndFlush(response);
        }
    }
}
接下来就可以通过GET、POST、PUT等Http请求去调用,需要注意的是,如果是通过浏览器访问,浏览器会自动调用另外一个请求:
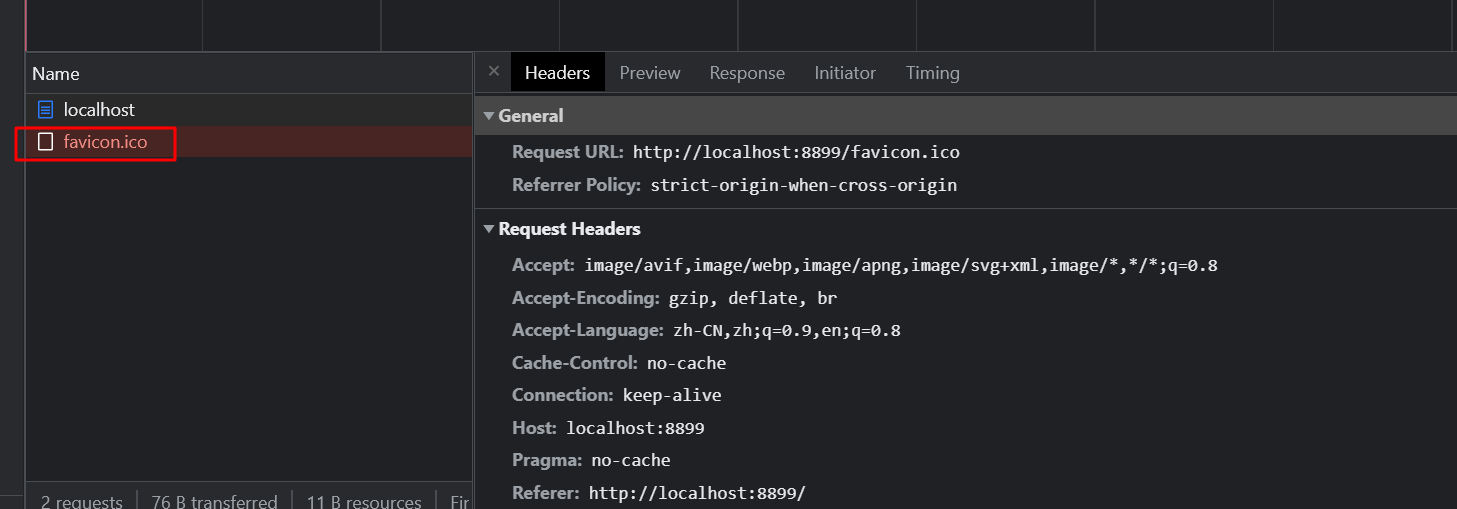
因此对于处理器我们做如下修改:
public class TestHttpServerHandler extends SimpleChannelInboundHandler<HttpObject> {
    @Override
    protected void channelRead0(ChannelHandlerContext ctx, HttpObject msg) throws Exception {
        if (msg instanceof HttpRequest) {
            HttpRequest httpRequest = (HttpRequest) msg;

            System.out.println("request method name: " + httpRequest.method().name());

            URI uri = new URI(httpRequest.uri());
            if ("/favicon.ico".equals(uri.getPath())) {
                System.out.println("request favicon.ico");
                return;
            }

            ByteBuf content = Unpooled.copiedBuffer("hello world", CharsetUtil.UTF_8);
            FullHttpResponse response = new DefaultFullHttpResponse(HttpVersion.HTTP_1_1,
                    HttpResponseStatus.OK, content);
            response.headers().set(HttpHeaderNames.CONTENT_TYPE, "text/plain");
            response.headers().set(HttpHeaderNames.CONTENT_LENGTH, content.readableBytes());
            ctx.writeAndFlush(response);
        }
    }
}
这样一个基于Netty的Hello world就成功的运行了起来。
Netty模块分析
Netty整体执行流程分析
public class TestHttpServerHandler extends SimpleChannelInboundHandler<HttpObject> {

    @Override
    protected void channelRead0(ChannelHandlerContext ctx, HttpObject msg) throws Exception {
        if (msg instanceof HttpRequest) {
            HttpRequest httpRequest = (HttpRequest) msg;

            // System.out.println("request method name: " + httpRequest.method().name());

            URI uri = new URI(httpRequest.uri());
            if ("/favicon.ico".equals(uri.getPath())) {
                // System.out.println("request favicon.ico");
                return;
            }

            ByteBuf content = Unpooled.copiedBuffer("hello world", CharsetUtil.UTF_8);
            FullHttpResponse response = new DefaultFullHttpResponse(HttpVersion.HTTP_1_1,
                    HttpResponseStatus.OK, content);
            response.headers().set(HttpHeaderNames.CONTENT_TYPE, "text/plain");
            response.headers().set(HttpHeaderNames.CONTENT_LENGTH, content.readableBytes());
            ctx.writeAndFlush(response);
        }
    }

    @Override
    public void channelActive(ChannelHandlerContext ctx) throws Exception {
        System.out.println("channel active");
        super.channelActive(ctx);
    }

    @Override
    public void channelRegistered(ChannelHandlerContext ctx) throws Exception {
        System.out.println("channel registered");
        super.channelRegistered(ctx);
    }

    @Override
    public void channelUnregistered(ChannelHandlerContext ctx) throws Exception {
        System.out.println("channel unregistered");
        super.channelUnregistered(ctx);
    }

    @Override
    public void channelInactive(ChannelHandlerContext ctx) throws Exception {
        System.out.println("channel inactive");
        super.channelInactive(ctx);
    }

    @Override
    public void handlerAdded(ChannelHandlerContext ctx) throws Exception {
        System.out.println("channel added");
        super.handlerAdded(ctx);
    }
}
上面的例子想要说明的是,在Servlet编程模型中,关闭连接都是自动完成的,而在Netty当中,关闭的时机是可以自定义的,这样每次调用之后就会关闭了:
ctx.channel().close();
Netty对Socket的实现
Netty不仅可以做为服务端,也可以作为客户端的基础设施。
Socket使用示例
类似的,我们首先定义好服务端相关的内容:
public class MyServer {
    public static void main(String[] args) throws Exception {
        EventLoopGroup bossGroup = new NioEventLoopGroup();
        EventLoopGroup workerGroup = new NioEventLoopGroup();
        try {
            ServerBootstrap serverBootstrap = new ServerBootstrap();
            serverBootstrap.group(bossGroup, workerGroup).channel(NioServerSocketChannel.class)
                    .childHandler(new MyServerInitializer());
            ChannelFuture channelFuture = serverBootstrap.bind(8899).sync();
            channelFuture.channel().closeFuture().sync();
        } finally {
            bossGroup.shutdownGracefully();
            workerGroup.shutdownGracefully();
        }
    }
}
public class MyServerHandler extends SimpleChannelInboundHandler<String> {
    @Override
    protected void channelRead0(ChannelHandlerContext ctx, String msg) throws Exception {
        System.out.println(ctx.channel().remoteAddress() + "," + msg);
        ctx.channel().writeAndFlush("from server: " + UUID.randomUUID());
    }

    @Override
    public void exceptionCaught(ChannelHandlerContext ctx, Throwable cause) throws Exception {
        cause.printStackTrace();
        ctx.close();
    }
}
在Netty中有两种发送消息的方式,可以直接写到Channel中,也可以写到与ChannelHandler所关联的那个ChannelHanderContext中。对于前一种方式来说,消息会从ChannelPipline的末尾开始流动,对于后一种方式来说,消息将从ChannelPipline中的下一个ChannelHandler开始流动。
public class MyServerInitializer extends ChannelInitializer<SocketChannel> {

    @Override
    protected void initChannel(SocketChannel ch) throws Exception {
        ChannelPipeline pipeline = ch.pipeline();

        pipeline.addLast(new LengthFieldBasedFrameDecoder(Integer.MAX_VALUE, 0, 4, 0, 4));
        pipeline.addLast(new LengthFieldPrepender(4));
        pipeline.addLast(new StringDecoder(CharsetUtil.UTF_8));
        pipeline.addLast(new StringEncoder(CharsetUtil.UTF_8));
        pipeline.addLast(new MyServerHandler());
    }
}
接下来是客户端的相关示例:
public class MyClient {
    public static void main(String[] args) throws Exception {
        EventLoopGroup eventLoopGroup = new NioEventLoopGroup();
        try {
            Bootstrap bootstrap = new Bootstrap();
            bootstrap.group(eventLoopGroup).channel(NioSocketChannel.class).
                    handler(new MyClientInitializer()); // 这里也可以使用匿名内部类
            ChannelFuture channelFuture = bootstrap.connect("localhost", 8899).sync();
            channelFuture.channel().closeFuture().sync();
        } finally {
            eventLoopGroup.shutdownGracefully();
        }
    }
}
public class MyClientHandler extends SimpleChannelInboundHandler<String> {

    @Override
    public void channelActive(ChannelHandlerContext ctx) throws Exception {
        ctx.writeAndFlush("from client!!");
    }

    @Override
    public void exceptionCaught(ChannelHandlerContext ctx, Throwable cause) throws Exception {
        cause.printStackTrace();
        ctx.close();
    }

    @Override
    protected void channelRead0(ChannelHandlerContext ctx, String msg) throws Exception {
        System.out.println(ctx.channel().remoteAddress());
        System.out.println("client output: " + msg);
        ctx.writeAndFlush("from client: " + LocalDateTime.now());
    }
}
public class MyClientInitializer extends ChannelInitializer<SocketChannel> {
    @Override
    protected void initChannel(SocketChannel ch) throws Exception {
        ChannelPipeline pipeline = ch.pipeline();

        pipeline.addLast(new LengthFieldBasedFrameDecoder(Integer.MAX_VALUE, 0, 4, 0, 4));
        pipeline.addLast(new LengthFieldPrepender(4));
        pipeline.addLast(new StringDecoder(CharsetUtil.UTF_8));
        pipeline.addLast(new StringEncoder(CharsetUtil.UTF_8));
        pipeline.addLast(new MyClientHandler());
    }
}
消息的广播
首先定义好服务端内容:
public class MyChatServer {
    public static void main(String[] args) throws Exception {
        EventLoopGroup bossGroup = new NioEventLoopGroup();
        EventLoopGroup workerGroup = new NioEventLoopGroup();
        try {
            ServerBootstrap serverBootstrap = new ServerBootstrap();
            serverBootstrap.group(bossGroup, workerGroup).channel(NioServerSocketChannel.class)
                    .childHandler(new MyChatServerInitializer());
            ChannelFuture channelFuture = serverBootstrap.bind(8899).sync();
            channelFuture.channel().closeFuture().sync();
        } finally {
            bossGroup.shutdownGracefully();
            workerGroup.shutdownGracefully();
        }
    }
}
public class MyChatServerInitializer extends ChannelInitializer<SocketChannel> {
    @Override
    protected void initChannel(SocketChannel ch) throws Exception {
        ChannelPipeline pipeline = ch.pipeline();
        pipeline.addLast(new DelimiterBasedFrameDecoder(4096, Delimiters.lineDelimiter()));
        pipeline.addLast(new StringDecoder(CharsetUtil.UTF_8));
        pipeline.addLast(new StringEncoder(CharsetUtil.UTF_8));
        pipeline.addLast(new MyChatServerHandler());
    }
}
public class MyChatServerHandler extends SimpleChannelInboundHandler<String> {

    private static ChannelGroup channelGroup = new DefaultChannelGroup(GlobalEventExecutor.INSTANCE);

    @Override
    protected void channelRead0(ChannelHandlerContext ctx, String msg) throws Exception {
        Channel channel = ctx.channel();
        channelGroup.forEach(ch -> {
            if (channel != ch) {
                channel.writeAndFlush(channel.remoteAddress() + "send message: " + msg + "\n");
            } else {
                ch.writeAndFlush("[mine]" + msg + "\n");
            }
        });
    }

    @Override
    public void handlerAdded(ChannelHandlerContext ctx) throws Exception {
        Channel channel = ctx.channel();
        channelGroup.writeAndFlush("[server] - " + channel.remoteAddress() + "join\n");
        channelGroup.add(channel);
    }

    @Override
    public void handlerRemoved(ChannelHandlerContext ctx) throws Exception {
        Channel channel = ctx.channel();
        channelGroup.writeAndFlush("[server] - " + channel.remoteAddress() + "remove\n");

        System.out.println(channelGroup.size());
    }

    @Override
    public void channelActive(ChannelHandlerContext ctx) throws Exception {
        Channel channel = ctx.channel();
        System.out.println(channel.remoteAddress() + "online");
    }

    @Override
    public void channelInactive(ChannelHandlerContext ctx) throws Exception {
        Channel channel = ctx.channel();
        System.out.println(channel.remoteAddress() + "offline");
    }

    @Override
    public void exceptionCaught(ChannelHandlerContext ctx, Throwable cause) throws Exception {
        cause.printStackTrace();
        ctx.close();
    }
}
然后定义好服务端示例:
public class MyChatClient {
    public static void main(String[] args) throws Exception {
        EventLoopGroup eventLoopGroup = new NioEventLoopGroup();
        try {
            Bootstrap bootstrap = new Bootstrap();
            bootstrap.group(eventLoopGroup).channel(NioSocketChannel.class).
                    handler(new MyChatClientInitializer());
            Channel channel = bootstrap.connect("localhost", 8899).sync().channel();
            BufferedReader br = new BufferedReader(new InputStreamReader(System.in));
            for (; ; ) {
                channel.writeAndFlush(br.readLine() + "\r\n");
            }
        } finally {
            eventLoopGroup.shutdownGracefully();
        }
    }
}
public class MyChatClientInitializer extends ChannelInitializer<SocketChannel> {
    @Override
    protected void initChannel(SocketChannel ch) throws Exception {
        ChannelPipeline pipeline = ch.pipeline();
        pipeline.addLast(new DelimiterBasedFrameDecoder(4096, Delimiters.lineDelimiter()));
        pipeline.addLast(new StringDecoder(CharsetUtil.UTF_8));
        pipeline.addLast(new StringEncoder(CharsetUtil.UTF_8));
        pipeline.addLast(new MyChatClientHandler());
    }
}
public class MyChatClientHandler extends SimpleChannelInboundHandler<String> {
    @Override
    protected void channelRead0(ChannelHandlerContext ctx, String msg) throws Exception {
        System.out.println(msg);
    }
}
心跳机制
public class MyServer {
    public static void main(String[] args) throws Exception {
        EventLoopGroup bossGroup = new NioEventLoopGroup();
        EventLoopGroup workerGroup = new NioEventLoopGroup();
        try {
            ServerBootstrap serverBootstrap = new ServerBootstrap();
            serverBootstrap.group(bossGroup, workerGroup).channel(NioServerSocketChannel.class)
                    .handler(new LoggingHandler(LogLevel.INFO)).childHandler(new MyServerInitializer());
            ChannelFuture channelFuture = serverBootstrap.bind(8899).sync();
            channelFuture.channel().closeFuture().sync();
        } finally {
            bossGroup.shutdownGracefully();
            workerGroup.shutdownGracefully();
        }
    }
}
public class MyServerInitializer extends ChannelInitializer<SocketChannel> {
    @Override
    protected void initChannel(SocketChannel ch) throws Exception {
        ChannelPipeline pipeline = ch.pipeline();
        // 空闲状态检测的处理器
        pipeline.addLast(new IdleStateHandler(5, 7, 10, TimeUnit.SECONDS));
        pipeline.addLast(new MyServerHandler());
    }
}
public class MyServerHandler extends ChannelInboundHandlerAdapter {
    @Override
    public void userEventTriggered(ChannelHandlerContext ctx, Object evt) throws Exception {
        if (evt instanceof IdleStateEvent) {
            IdleStateEvent event = (IdleStateEvent) evt;
            String eventType = null;
            switch (event.state()) {
                case READER_IDLE:
                    eventType = "read idle";
                    break;
                case WRITER_IDLE:
                    eventType = "write idle";
                    break;
                case ALL_IDLE:
                    eventType = "all idle";
                    break;
            }
            System.out.println(ctx.channel().remoteAddress() + "time out event: " + eventType);

            ctx.channel().close();
        }
    }
}
Netty与WebSocket
原来基于Http协议实现的长链接存在的问题:
- 轮询机制下,消息还是无法实时传递
- 请求需要携带请求头
- 消耗资源
WebSocket是基于Http协议的升级协议,是一种真正的全双工的协议。
实现与原理分析
WebSocket协议是基于Http的升级协议,所以浏览器在请求WebSocket的请求时实际上会请求两次。
WebSocket生命周期分解
服务端示例:
public class MyServer {
    public static void main(String[] args) throws Exception {
        EventLoopGroup bossGroup = new NioEventLoopGroup();
        EventLoopGroup workerGroup = new NioEventLoopGroup();
        try {
            ServerBootstrap serverBootstrap = new ServerBootstrap();
            serverBootstrap.group(bossGroup, workerGroup).channel(NioServerSocketChannel.class)
                    .handler(new LoggingHandler(LogLevel.INFO)).childHandler(new WebSocketChannelInitializer());
            ChannelFuture channelFuture = serverBootstrap.bind(new InetSocketAddress(8899)).sync();
            channelFuture.channel().closeFuture().sync();
        } finally {
            bossGroup.shutdownGracefully();
            workerGroup.shutdownGracefully();
        }
    }
}
public class WebSocketChannelInitializer extends ChannelInitializer<SocketChannel> {
    @Override
    protected void initChannel(SocketChannel ch) throws Exception {
        ChannelPipeline pipeline = ch.pipeline();
        pipeline.addLast(new HttpServerCodec());
        pipeline.addLast(new ChunkedWriteHandler());
        pipeline.addLast(new HttpObjectAggregator(8192));
        // ws://server:port/context_path(localhost:9999/ws)
        pipeline.addLast(new WebSocketServerProtocolHandler("/ws"));
        pipeline.addLast(new TextWebSocketFrameHandler());
    }
}
public class TextWebSocketFrameHandler extends SimpleChannelInboundHandler<TextWebSocketFrame> {
    @Override
    protected void channelRead0(ChannelHandlerContext ctx, TextWebSocketFrame msg) throws Exception {
        System.out.println("receive " + msg.text());
        ctx.channel().writeAndFlush(new TextWebSocketFrame("server time: " + LocalDateTime.now()));
    }

    @Override
    public void handlerAdded(ChannelHandlerContext ctx) throws Exception {
        System.out.println("handlerAdded: " + ctx.channel().id().asLongText());
    }

    @Override
    public void handlerRemoved(ChannelHandlerContext ctx) throws Exception {
        System.out.println("handlerRemoved: " + ctx.channel().id().asLongText());
    }

    @Override
    public void exceptionCaught(ChannelHandlerContext ctx, Throwable cause) throws Exception {
        System.out.println("exception happen...");
    }
}
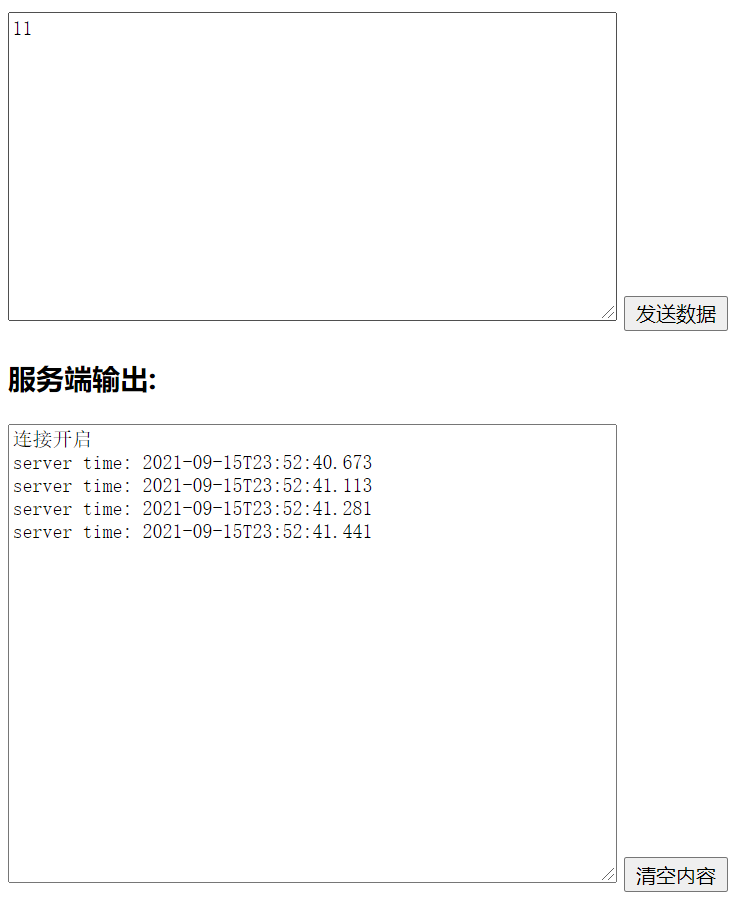
客户端代码:
<!DOCTYPE html>
<html lang="en">
<head>
    <meta charset="UTF-8">
    <title>WebSocket客户端</title>
</head>
<body>
<script type="text/javascript">
    var socket;
    if(window.WebSocket) {
        socket = new WebSocket("ws://localhost:8899/ws");
        socket.onmessage = function(event) {
            var ta = document.getElementById("responseText");
            ta.value = ta.value + "\n" + event.data;
        }
        socket.onopen = function(event) {
            var ta = document.getElementById("responseText");
            ta.value = "连接开启";
        }
        socket.onclose = function(event) {
            var ta = document.getElementById("responseText");
            ta.value = ta.value + "\n" + "连接关闭"
        }
    } else {
        alert("not support")
    }
    function send(message) {
        if(!window.WebSocket) {
            return;
        }
        if(socket.readyState == WebSocket.OPEN) {
            socket.send(message);
        }else {
            alert("连接尚未开启!")
        }
    }

</script>
<form onsubmit="return false;">
    <textarea name="message" style="width:400px;height:200px"></textarea>
    <input type="button" value="发送数据" onclick="send(this.form.message.value)">
    <h3>服务端输出: </h3>
    <textarea id="responseText" style="width:400px;height:300px;"></textarea>
    <input type="button" onclick="javascript:document.getElementById('responseText').value=''" value="清空内容">
</form>

</body>

</html>
测试结果:
RPC框架分析
Google Protobuf
简介
Google Protobuf的前身:rmi(remote method invocation),只有Java语言才可以使用,其中涉及到两个角色:
- client:stub
- server:skeleton
序列化与反序列化,也叫做:编码与解码。
RPC:Romote Produre Call(远程过程调用),很多RPC框架都是跨语言的,RPC框架一般的使用规则如下:
- 定义一个接口说明文件:描述了对象(结构体)、对象成员、接口方法等一系列信息
- 通过RPC框架所提供的编译器,将接口说明文件编译成具体的语言文件
- 在客户端与服务器端分别引入RPC编译器所生成的文件,即可像调用本地方法一样调用远程方法
proto文件
.proto文件的示例:
syntax = "proto2";

package tutorial;

option java_multiple_files = true;
option java_package = "com.example.tutorial.protos";
option java_outer_classname = "AddressBookProtos";

message Person {
  optional string name = 1;
  optional int32 id = 2;
  optional string email = 3;

  enum PhoneType {
    MOBILE = 0;
    HOME = 1;
    WORK = 2;
  }

  message PhoneNumber {
    optional string number = 1;
    optional PhoneType type = 2 [default = HOME];
  }

  repeated PhoneNumber phones = 4;
}

message AddressBook {
  repeated Person people = 1;
}
构建一个message的示例:
Person john =
  Person.newBuilder()
    .setId(1234)
    .setName("John Doe")
    .setEmail("[email protected]")
    .addPhones(
      Person.PhoneNumber.newBuilder()
        .setNumber("555-4321")
        .setType(Person.PhoneType.HOME))
    .build();
内置方法:
- isInitialized()
- toString()
- mergeFrom(Message other)
- clear()
解析和序列化
每一个protocol buffer都有读写二进制消息的方法:
- byte[] toByteArray()
- static Person parseFrom(byte[] data)
- void writeTo(OutputStream output)
- static Person parseFrom(InputStream input)
message对象并不支持继承。
编写message
import com.example.tutorial.protos.AddressBook;
import com.example.tutorial.protos.Person;
import java.io.BufferedReader;
import java.io.FileInputStream;
import java.io.FileNotFoundException;
import java.io.FileOutputStream;
import java.io.InputStreamReader;
import java.io.IOException;
import java.io.PrintStream;

class AddPerson {
  // This function fills in a Person message based on user input.
  static Person PromptForAddress(BufferedReader stdin,
                                 PrintStream stdout) throws IOException {
    Person.Builder person = Person.newBuilder();

    stdout.print("Enter person ID: ");
    person.setId(Integer.valueOf(stdin.readLine()));

    stdout.print("Enter name: ");
    person.setName(stdin.readLine());

    stdout.print("Enter email address (blank for none): ");
    String email = stdin.readLine();
    if (email.length() > 0) {
      person.setEmail(email);
    }

    while (true) {
      stdout.print("Enter a phone number (or leave blank to finish): ");
      String number = stdin.readLine();
      if (number.length() == 0) {
        break;
      }

      Person.PhoneNumber.Builder phoneNumber =
        Person.PhoneNumber.newBuilder().setNumber(number);

      stdout.print("Is this a mobile, home, or work phone? ");
      String type = stdin.readLine();
      if (type.equals("mobile")) {
        phoneNumber.setType(Person.PhoneType.MOBILE);
      } else if (type.equals("home")) {
        phoneNumber.setType(Person.PhoneType.HOME);
      } else if (type.equals("work")) {
        phoneNumber.setType(Person.PhoneType.WORK);
      } else {
        stdout.println("Unknown phone type.  Using default.");
      }

      person.addPhones(phoneNumber);
    }

    return person.build();
  }

  // Main function:  Reads the entire address book from a file,
  //   adds one person based on user input, then writes it back out to the same
  //   file.
  public static void main(String[] args) throws Exception {
    if (args.length != 1) {
      System.err.println("Usage:  AddPerson ADDRESS_BOOK_FILE");
      System.exit(-1);
    }

    AddressBook.Builder addressBook = AddressBook.newBuilder();

    // Read the existing address book.
    try {
      addressBook.mergeFrom(new FileInputStream(args[0]));
    } catch (FileNotFoundException e) {
      System.out.println(args[0] + ": File not found.  Creating a new file.");
    }

    // Add an address.
    addressBook.addPerson(
      PromptForAddress(new BufferedReader(new InputStreamReader(System.in)),
                       System.out));

    // Write the new address book back to disk.
    FileOutputStream output = new FileOutputStream(args[0]);
    addressBook.build().writeTo(output);
    output.close();
  }
}
读取message
import com.example.tutorial.protos.AddressBook;
import com.example.tutorial.protos.Person;
import java.io.FileInputStream;
import java.io.IOException;
import java.io.PrintStream;

class ListPeople {
  // Iterates though all people in the AddressBook and prints info about them.
  static void Print(AddressBook addressBook) {
    for (Person person: addressBook.getPeopleList()) {
      System.out.println("Person ID: " + person.getId());
      System.out.println("  Name: " + person.getName());
      if (person.hasEmail()) {
        System.out.println("  E-mail address: " + person.getEmail());
      }

      for (Person.PhoneNumber phoneNumber : person.getPhonesList()) {
        switch (phoneNumber.getType()) {
          case MOBILE:
            System.out.print("  Mobile phone #: ");
            break;
          case HOME:
            System.out.print("  Home phone #: ");
            break;
          case WORK:
            System.out.print("  Work phone #: ");
            break;
        }
        System.out.println(phoneNumber.getNumber());
      }
    }
  }

  // Main function:  Reads the entire address book from a file and prints all
  //   the information inside.
  public static void main(String[] args) throws Exception {
    if (args.length != 1) {
      System.err.println("Usage:  ListPeople ADDRESS_BOOK_FILE");
      System.exit(-1);
    }

    // Read the existing address book.
    AddressBook addressBook =
      AddressBook.parseFrom(new FileInputStream(args[0]));

    Print(addressBook);
  }
}
多协议消息
一般来说有两种解决方案:
- 自定义解码器
- 通过枚举指定所有可能出现的类型
syntax = "proto2";
package com.jyc.protobuf;

option optimize_for = SPEED;
option java_package = "com.jyc.netty.sixth.example";
option java_outer_classname = "MyDataInfo";

message MyMessage {
  enum DataType {
    PersonType = 1;
    DogType = 2;
    CatType = 3;
  }

  required DataType data_type = 1;

  oneof dataBody {
    Person person = 2;
    Dog dog = 3;
    Cat cat = 4;
  }
}

message Person {
  required string name = 1;
  optional int32 age = 2;
  optional string address = 3;
}

message Dog {
  optional string name = 1;
  optional int32 age = 2;
}

message Cat {
  optional string name = 1;
  optional string city = 2;
}
最佳实践
如何共享生成的对象是一个问题,那么实际项目中该如何共享呢?
- git submodule
- git subtree
- nexus(每次需要都发布,并且修改版本号)
Apache Thrift
简介
thrift最初由Facebook研发,主要用于各个服务之间的RPC通信,支持跨语言,常用的语言比如C++、Java、Python、PHP、Ruby、Erlang、Perl、Haskell、C#、Cocoa、JavaScript、Node.js、Smalltalk和OCaml都支持,与protobuf相比,支持的语言种类更多。
thrift是一个典型的CS(客户端/服务端)结构,客户端和服务端可以使用不同的语言开发,他们之间需要一种中间语言来关联,这种语言就是IDL(Interface Description Language)。
thrift不支持无符号类型。因为很多编程语言不存在无符号类型,比如Java,集合中的元素可以是除了service之外的任何类型,包括exception。
thrift中的容器类型:
- list:一系列由T类型的数据组成的有序列表,元素可以重复
- set:一系列由T类型的数据组成的无序集合,元素不可重复
- map:一个字典结构,key为K类型,value为V类型,相当于Java中的HashMap
thrift数据传输使用socket(多种语言均支持),数据再以特定的格式(string等)发送,接收方语言进行解析。
安装命令:
$ choco install thrift
thrift文件
.thrift文件的示例:
namespace java thrift.generated

typedef i64 short
typedef i32 int
typedef i64 long
typedef bool boolean
typedef string String

struct Person {
    1: optional String username,
    2: optional int age,
    3: optional boolean married
}

exception DataException {
    1: optional String message,
    2: optional String callStack,
    3: optional String date
}

service PersonService {
    Person getPersonByUsername(1:required String username) throws(1: DataException dataException),
    void savePerson(1:required Person person) throws(1: DataException dataException)
}
生成代码:
$ thrift --gen java .\src\thrift\data.thrift
最佳实践
public class PersonServiceImpl implements PersonService.Iface {
    @Override
    public Person getPersonByUsername(String username) throws DataException, TException {
        System.out.println("Got client param: " + username);
        return new Person().setUsername(username).setAge(20).setMarried(false);
    }

    @Override
    public void savePerson(Person person) throws DataException, TException {
        System.out.println("Got client param: " + person);
        System.out.println(person.getUsername());
        System.out.println(person.getAge());
    }
}
服务端:
public class ThriftServer {
    public static void main(String[] args) throws Exception {
        TNonblockingServerSocket socket = new TNonblockingServerSocket(8899);
        THsHaServer.Args arg = new THsHaServer.Args(socket).minWorkerThreads(2).maxWorkerThreads(4);
        PersonService.Processor<PersonServiceImpl> processor = new PersonService.Processor<>(new PersonServiceImpl());
        arg.protocolFactory(new TCompactProtocol.Factory());
        arg.transportFactory(new TFramedTransport.Factory());
        arg.processorFactory(new TProcessorFactory(processor));

        TServer server = new THsHaServer(arg);

        System.out.println("thrift server started!");
        server.serve();
    }
}
客户端:
public class ThriftClient {
    public static void main(String[] args) throws Exception {
        TTransport transport = new TFramedTransport(new TSocket("localhost", 8899), 600);
        TCompactProtocol protocol = new TCompactProtocol(transport);
        PersonService.Client client = new PersonService.Client(protocol);
        try {
            transport.open();
            Person person = client.getPersonByUsername("jyc");
            System.out.println(person.getAge());
            System.out.println(person.getUsername());

            Person person2 = new Person();
            person2.setUsername("jjj");
            person2.setAge(30);
            person2.setMarried(true);
            client.savePerson(person2);

        } catch (Exception ex) {
            throw new RuntimeException(ex.getMessage(), ex);
        } finally {
            transport.close();
        }
    }
}
传输格式
- TBinaryProtocol - 二进制格式
- TCompactProtocol - 压缩格式
- TJSONProtocol - JSON格式
- TSimpleJSONProtocol - 提供JSON只写协议,生成的文件很容易通过脚本语言解析
- TDebugProtocol - 使用易懂的可读的文本格式,以便于debug
传输方式
- TSocket - 阻塞式socket
- TCompactProtocol 以frame为单位进行传输,非阻塞式服务中使用
- TFileTransport - 以文件形式进行传输
- TMemoryTransport - 将内存用于I/O,Java实现时内部实际使用了简单的ByteArrayOutputStream
- TZlibTransport - 使用zlib进行压缩,与其他传输方式联合使用
服务模型
- TSimpleServer - 简单的单线程服务模型,通常用于测试
- TThreadPoolServer - 多线程服务模型,使用标准的阻塞式IO
- TNonblockingServer - 多线程服务模型,使用非阻塞IO(需使用TFramedTransport数据传输方式)
- THsHaServer - THsHa引入了线程池去处理,其模型把读写任务放到线程池中去处理;Half-sync/Half-sync的处理模式,Half-async是在处理IO事件上(accept/read/write io),Half-sync用于handler对rpc的同步处理
多语言的支持
接下来的例子,我们将使用Python作为客户端,Java作为服务端。
__author__ = '作者'

from py.thrift.generated import PersonService
from py.thrift.generated import ttypes

from thrift import Thrift
from thrift import transport
from thrift import protocol
from thrift.transport import TSocket
from thrift.transport import TTransport
from thrift.protocol import TCompactProtocol


try:
    tSocket = TSocket.TSocket('localhost',8899)
    tSocket.setTimeout(600)

    transport = TTransport.TFramedTransport(tSocket)
    protocol = TCompactProtocol.TCompactProtocol(transport)
    client = PersonService.Client(protocol)

    transport.open()

    person = client.getPersonByUsername("jyc")

    print(person.username)
    print(person.age)
    print(person.married)

    print('-------')

    newPerson = ttypes.Person()
    newPerson.username = 'jjj'
    newPerson.age = 30
    newPerson.married = True

    client.savePerson(newPerson)

    transport.close()

except Thrift.TException as tx:
    print('%s' % tx.message)
将python作为服务端,将Java作为客户端:
__author__ = '作者'

from py.thrift.generated import ttypes

class PersonServiceImpl:
    def getPersonByUsername(self,username):
        print('Got Client param: ' + username)

        person = ttypes.Person()
        person.username = username
        person.age = 20
        person.married = False

        return person


    def savePerson(self, person):
        print('Got Client param: ')

        print(person.username)
        print(person.age)
        print(person.married)
服务端代码:
__author__ = '作者'

from thrift import server
from PersonServiceImpl import PersonServiceImpl
from py.thrift.generated import PersonService
from thrift import Thrift
from thrift.transport import TSocket
from thrift.transport import TTransport
from thrift.server import TServer
from thrift.protocol import TCompactProtocol

try:
    PersonServiceHandler = PersonServiceImpl()
    processor = PersonService.Processor(PersonServiceHandler)

    serverSocket = TSocket.TServerSocket(port=8899)
    transportFactory = TTransport.TFramedTransportFactory()
    protocolFactory = TCompactProtocol.TCompactProtocolFactory()

    server = TServer.TSimpleServer(processor, serverSocket, transportFactory, protocolFactory)
    server.serve()
except Thrift.TException as ex:
    print('%s' % ex.message)
可以看到,thrift在跨语言的时候的作用。
GRPC
简介
GRPC是基于protobuf的RPC远程调用框架。
相关示例
所使用的protobuf的文件:
syntax = "proto3";

package com.jyc.proto;

option java_package = "com.jyc.proto";
option java_outer_classname = "StudentProto";
option java_multiple_files = true;

service StudentService {
  rpc GetRealNameByUsername(MyRequest) returns (MyResponse) {}
}

message MyRequest {
  string username = 1;
}

message MyResponse {
  string realname = 2;
}
gradle配置:
plugins {
    id 'org.springframework.boot' version '2.5.4'
    id 'io.spring.dependency-management' version '1.0.11.RELEASE'
    id 'java'
    id 'com.google.protobuf' version '0.8.17'
}

group = 'com.jyc.netty'
version = '0.0.1-SNAPSHOT'
sourceCompatibility = '1.8'
targetCompatibility = '1.8'

repositories {
    mavenCentral()
}

dependencies {
    implementation 'io.netty:netty-all:4.1.66.Final'
    implementation 'org.apache.thrift:libthrift:0.14.2'
    implementation 'com.google.protobuf:protobuf-java:4.0.0-rc-2'
    implementation 'io.grpc:grpc-netty-shaded:1.40.1'
    implementation 'io.grpc:grpc-protobuf:1.40.1'
    implementation 'io.grpc:grpc-stub:1.40.1'
}

protobuf {
    protoc {
        artifact = "com.google.protobuf:protoc:3.17.3"
    }
    plugins {
        grpc {
            artifact = 'io.grpc:protoc-gen-grpc-java:1.40.1'
        }
    }
    generateProtoTasks {
        all()*.plugins {
            grpc {}
        }
    }
}
public class StudentServiceImpl extends StudentServiceGrpc.StudentServiceImplBase {

    @Override
    public void getRealNameByUsername(MyRequest request, StreamObserver<MyResponse> responseObserver) {
        System.out.println("receive client info: " + request.getUsername());
        // 构造结果并返回
        responseObserver.onNext(MyResponse.newBuilder().setRealname("jyc").build());
        responseObserver.onCompleted();
    }
}
public class GrpcServer {

    private Server server;

    private void start() throws IOException {
        server = ServerBuilder.forPort(8899).addService(new StudentServiceImpl()).build().start();
        System.out.println("server started!");
    }

    private void stop() throws InterruptedException {
        if (server != null) {
            server.shutdown().awaitTermination(30, TimeUnit.SECONDS);
            System.out.println("server stop!");
        }
    }

    /**
     * 需要手动设置阻塞
     *
     * @throws InterruptedException
     */
    private void blockUntilShutdown() throws InterruptedException {
        if (server != null) {
            server.awaitTermination();
        }
    }

    public static void main(String[] args) throws IOException, InterruptedException {
        GrpcServer server = new GrpcServer();
        server.start();
        // 如果不设置,启动就会退出
        server.blockUntilShutdown();
    }
}
public class GrpcClient {
    public static void main(String[] args) {
        ManagedChannel managedChannel = ManagedChannelBuilder.forAddress("localhost", 8899).usePlaintext().build();
        StudentServiceGrpc.StudentServiceBlockingStub blockingStub = StudentServiceGrpc.newBlockingStub(managedChannel);
        MyResponse myResponse = blockingStub.getRealNameByUsername(MyRequest.newBuilder().setUsername("zhangsan").build());
        System.out.println(myResponse.getRealname());
    }
}
流式调用
syntax = "proto3";

package com.jyc.proto;

option java_package = "com.jyc.proto";
option java_outer_classname = "StudentProto";
option java_multiple_files = true;

service StudentService {
  rpc GetRealNameByUsername(MyRequest) returns (MyResponse) {}

  rpc GetStudentsByAge(StudentRequest) returns (stream StudentResponse) {}

  rpc GetStudentsWrapperByAges(stream StudentRequest) returns (StudentResponseList) {}

  rpc BiTalk(stream StreamRequest) returns (stream StreamResponse) {}
}

message MyRequest {
  string username = 1;
}

message MyResponse {
  string realname = 2;
}

message StudentRequest {
  int32 age = 1;
}

message StudentResponse {
  string name = 1;
  int32 age = 2;
  string city = 3;
}

message StudentResponseList {
  repeated StudentResponse studentResponse = 1;
}

message StreamRequest {
  string request_info = 1;
}

message StreamResponse {
  string response_info = 1;
}
package com.jyc.grpc;

import com.jyc.proto.*;
import io.grpc.stub.StreamObserver;

import java.util.UUID;

public class StudentServiceImpl extends StudentServiceGrpc.StudentServiceImplBase {

    @Override
    public void getRealNameByUsername(MyRequest request, StreamObserver<MyResponse> responseObserver) {
        System.out.println("receive client info: " + request.getUsername());
        // 构造结果并返回
        responseObserver.onNext(MyResponse.newBuilder().setRealname("jyc").build());
        responseObserver.onCompleted();
    }

    @Override
    public void getStudentsByAge(StudentRequest request, StreamObserver<StudentResponse> responseObserver) {
        System.out.println("receive client info: " + request.getAge());
        responseObserver.onNext(StudentResponse.newBuilder().setName("jyc").setAge(20).setCity("shenzhen").build());
        responseObserver.onNext(StudentResponse.newBuilder().setName("zhangsan").setAge(30).setCity("beijing").build());
        responseObserver.onNext(StudentResponse.newBuilder().setName("lisi").setAge(40).setCity("hangzhou").build());
        responseObserver.onNext(StudentResponse.newBuilder().setName("wangwu").setAge(50).setCity("shanghai").build());
        responseObserver.onCompleted();
    }

    @Override
    public StreamObserver<StudentRequest> getStudentsWrapperByAges(StreamObserver<StudentResponseList> responseObserver) {
        return new StreamObserver<StudentRequest>() {
            @Override
            public void onNext(StudentRequest value) {
                System.out.println("onNext: " + value.getAge());
            }

            @Override
            public void onError(Throwable t) {
                System.out.println(t.getMessage());
            }

            @Override
            public void onCompleted() {
                StudentResponse studentResponse = StudentResponse.newBuilder().setName("jyc").setAge(18).setCity("xian").build();
                StudentResponse studentResponse2 = StudentResponse.newBuilder().setName("jycoco").setAge(18).setCity("guangzhou").build();
                StudentResponseList studentResponseList = StudentResponseList.newBuilder().
                        addStudentResponse(studentResponse).addStudentResponse(studentResponse2).build();
                responseObserver.onNext(studentResponseList);
                responseObserver.onCompleted();
            }
        };
    }

    @Override
    public StreamObserver<StreamRequest> biTalk(StreamObserver<StreamResponse> responseObserver) {
        return new StreamObserver<StreamRequest>() {
            @Override
            public void onNext(StreamRequest value) {
                System.out.println("onNext: " + value.getRequestInfo());
                responseObserver.onNext(StreamResponse.newBuilder().setResponseInfo(UUID.randomUUID().toString()).build());
            }

            @Override
            public void onError(Throwable t) {
                System.out.println(t.getMessage());
            }

            @Override
            public void onCompleted() {
                responseObserver.onCompleted();
            }
        };
    }
}
package com.jyc.grpc;

import io.grpc.Server;
import io.grpc.ServerBuilder;

import java.io.IOException;
import java.util.concurrent.TimeUnit;

public class GrpcServer {

    private Server server;

    private void start() throws IOException {
        server = ServerBuilder.forPort(8899).addService(new StudentServiceImpl()).build().start();
        System.out.println("server started!");

        Runtime.getRuntime().addShutdownHook(new Thread(() -> {
            // Use stderr here since the logger may have been reset by its JVM shutdown hook.
            System.err.println("*** shutting down gRPC server since JVM is shutting down");
            try {
                GrpcServer.this.stop();
            } catch (InterruptedException e) {
                e.printStackTrace(System.err);
            }
            System.err.println("*** server shut down");
        }));
    }

    private void stop() throws InterruptedException {
        if (server != null) {
            server.shutdown().awaitTermination(30, TimeUnit.SECONDS);
            System.out.println("server stop!");
        }
    }

    /**
     * 需要手动设置阻塞
     *
     * @throws InterruptedException
     */
    private void blockUntilShutdown() throws InterruptedException {
        if (server != null) {
            server.awaitTermination();
        }
    }

    public static void main(String[] args) throws IOException, InterruptedException {
        GrpcServer server = new GrpcServer();
        server.start();
        // 如果不设置,启动就会退出
        server.blockUntilShutdown();
    }
}
package com.jyc.grpc;

import com.jyc.proto.*;
import io.grpc.ManagedChannel;
import io.grpc.ManagedChannelBuilder;
import io.grpc.stub.StreamObserver;

import java.time.LocalDateTime;
import java.util.Iterator;

public class GrpcClient {
    public static void main(String[] args) throws Exception {
        ManagedChannel managedChannel = ManagedChannelBuilder.forAddress("localhost", 8899).usePlaintext().build();
        StudentServiceGrpc.StudentServiceBlockingStub blockingStub = StudentServiceGrpc.newBlockingStub(managedChannel);
        StudentServiceGrpc.StudentServiceStub stub = StudentServiceGrpc.newStub(managedChannel);
        MyResponse myResponse = blockingStub.getRealNameByUsername(MyRequest.newBuilder().setUsername("zhangsan").build());
        System.out.println(myResponse.getRealname());
        System.out.println("==========================");
        Iterator<StudentResponse> iter = blockingStub.getStudentsByAge(StudentRequest.newBuilder().setAge(20).build());
        while (iter.hasNext()) {
            StudentResponse studentResponse = iter.next();
            System.out.println(studentResponse.getName() + "," + studentResponse.getAge() + "," + studentResponse.getCity());
        }
        System.out.println("=======================");

        StreamObserver<StudentResponseList> studentResponseListStreamObserver = new StreamObserver<StudentResponseList>() {
            @Override
            public void onNext(StudentResponseList value) {
                value.getStudentResponseList().forEach(studentResponse -> {
                    System.out.println(studentResponse.getName());
                    System.out.println(studentResponse.getAge());
                    System.out.println(studentResponse.getCity());
                    System.out.println("*******");
                });
            }

            @Override
            public void onError(Throwable t) {
                System.out.println(t.getMessage());
            }

            @Override
            public void onCompleted() {
                System.out.println("completed()");
            }
        };
        // 以流式的方式发送的请求都是异步的
        StreamObserver<StudentRequest> studentRequestStreamObserver = stub.getStudentsWrapperByAges(studentResponseListStreamObserver);
        studentRequestStreamObserver.onNext(StudentRequest.newBuilder().setAge(20).build());
        studentRequestStreamObserver.onNext(StudentRequest.newBuilder().setAge(30).build());
        studentRequestStreamObserver.onNext(StudentRequest.newBuilder().setAge(40).build());
        studentRequestStreamObserver.onNext(StudentRequest.newBuilder().setAge(50).build());
        studentRequestStreamObserver.onCompleted();


        StreamObserver<StreamRequest> requestStreamObserver = stub.biTalk(new StreamObserver<StreamResponse>() {

            @Override
            public void onNext(StreamResponse value) {
                System.out.println(value.getResponseInfo());
            }

            @Override
            public void onError(Throwable t) {
                System.out.println(t.getMessage());
            }

            @Override
            public void onCompleted() {
                System.out.println("onCompleted!");
            }
        });

        for (int i = 0; i < 10; i++) {
            requestStreamObserver.onNext(StreamRequest.newBuilder().setRequestInfo(LocalDateTime.now().toString()).build());
            Thread.sleep(1000);
        }

        // 如果不休眠,会因为异步的原因而导致消息没有发送
        Thread.sleep(50000);
    }
}
NIO原理分析
IO与NIO
IO与NIO的区别
java.io中最为核心的一个概念是流(Stream),面向流的编程。Java中,一个流要么是输入流,要么是输出流,不可能同时既是输入流又是输出流。
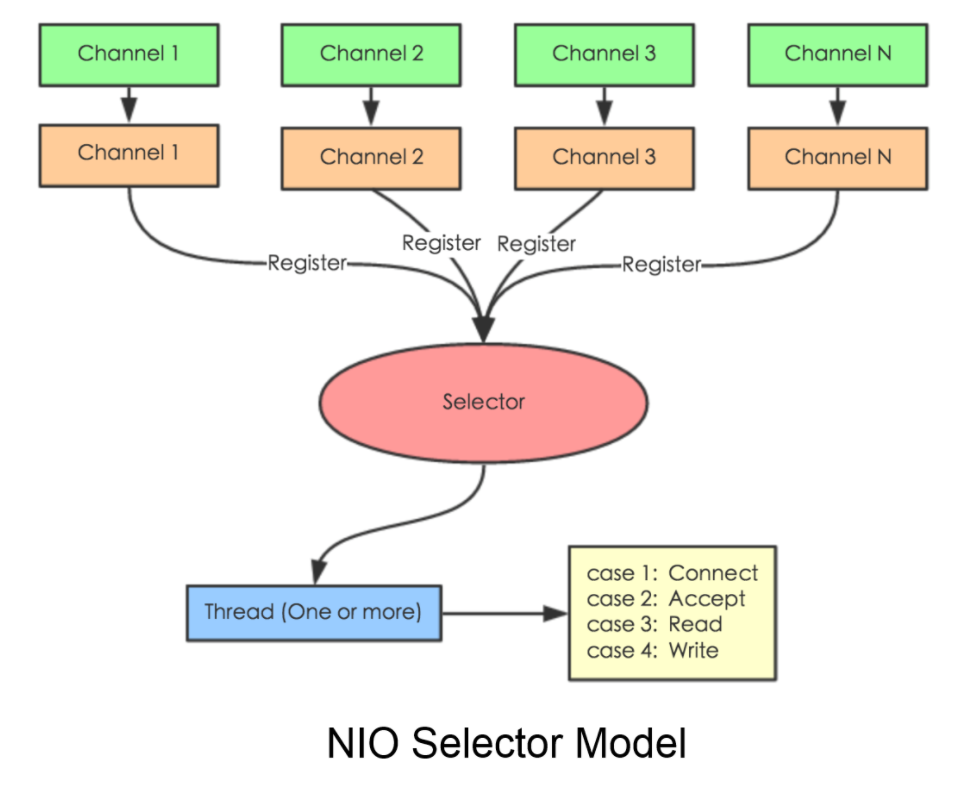
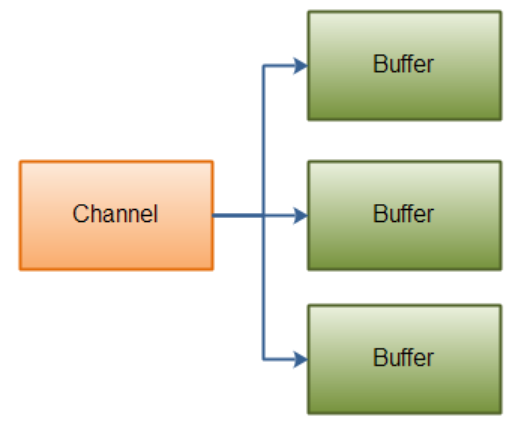
nio一种说法是new io,也可以认为是阻塞io,java.nio中拥有3个核心概念:Selector、Channel与Buffer。在java.nio中,我们是面向块(block)或是缓冲区(buffer)来编程的,nio的模型如下:
nio的程序的简单示例:
public class NioTest1 {
    public static void main(String[] args) {
        // 创建一个只能放置10个整数的缓冲区
        IntBuffer buffer = IntBuffer.allocate(10);
        for (int i = 0; i < buffer.capacity(); i++) {
            int randomNumber = new SecureRandom().nextInt(20);
            buffer.put(randomNumber);
        }
        // 通过这个方法可以实现读写的切换
        buffer.flip();
        while (buffer.hasRemaining()) {
            System.out.println(buffer.get());
        }
    }
}
Buffer
Buffer本身就是一块内存,底层实现上,它实际上就是一个数组。数据的读、写都是通过Buffer来实现的。
除了数组之外,Buffer还提供了对于数据的结构化访问方式,并且可以追踪到系统的读写过程。Java中的7种原生数据类型都有各自对应的Buffer类型,如IntBuffer、LongBuffer、ByteBuffer以及CharBuffer等。
关于NIO Buffer中的3个重要状态属性的含义:position、limit与capacity。
- capacity指的是它所包含的元素的个数,一个buffer的capacity永远不会是负数,也永远不会变化
- limit指的是第一个不应该被读或写的元素的索引,limit也不会是负数,并且不会大于capacity
- position指的是下一个将要读或写的元素的索引,position永远不会是负数,并且小于等于limit
它们之间的大小关系如下所示:
新创建的Buffer的position是0,mark是undefined,而limit的初始与Buffer的类型和创建方式有关。
Buffer中的核心API
- java.nio.Buffer#clear:将Buffer恢复成初始状态
- java.nio.Buffer#flip:将limit设置成当前的position,将position设置成0
- java.nio.Buffer#rewind:重新读取已经包含的数据,他会将position设置成0,limit保持不变
Buffer并不保证线程安全。
通过NIO读取文件涉及到三个步骤:
- 从FileInpuStream获取到FileChannel对象
- 创建Buffer
- 将数据从Channel读取到Buffer中
绝对方法与相对方法的含义:
- 相对方法:limit的值与position的值会在操作的时候被考虑到
- 绝对方法:完全忽略掉limit与position的值
除了支持常规的put的方法,ByteBuffer还提供了类型化的get与put方法:
/**
 * ByteBuffer类型化的put与get方法
 */
public class NioTest5 {
    public static void main(String[] args) {
        ByteBuffer buffer = ByteBuffer.allocate(64);
        buffer.putInt(15);
        buffer.putLong(500000L);
        buffer.putDouble(3.1415926);
        buffer.putChar('你');
        buffer.putShort((short) 2);
        buffer.putChar('我');

        buffer.flip();

        System.out.println(buffer.getInt());
        System.out.println(buffer.getLong());
        System.out.println(buffer.getDouble());
        System.out.println(buffer.getChar());
        System.out.println(buffer.getShort());
        System.out.println(buffer.getChar());
    }
}
Buffer中也提供了Slice方法:
public class NioTest6 {
    public static void main(String[] args) {
        ByteBuffer buffer = ByteBuffer.allocate(10);
        for (int i = 0; i < buffer.capacity(); i++) {
            buffer.put((byte) i);
        }
        buffer.position(2).limit(6);
        ByteBuffer slice = buffer.slice();
        for (int i = 0; i < slice.capacity(); i++) {
            byte b = slice.get(i);
            b *= 2;
            slice.put(i, b);
        }
        buffer.position(0);
        buffer.limit(buffer.capacity());
        while (buffer.hasRemaining()) {
            System.out.println(buffer.get());
        }
    }
}
新创建的Buffer和原来的Buffer共享相同的底层数组,这意味修改通过slice方法创建的Buffer也会修改原来的Buffer里面的值。
Buffer中也提供了只读Buffer的实现:
public class NioTest7 {
    public static void main(String[] args) {
        ByteBuffer buffer = ByteBuffer.allocate(10);
        for (int i = 0; i < buffer.capacity(); i++) {
            buffer.put((byte) i);
        }
        // 数据是和原来共享的,但是不允许修改
        ByteBuffer readOnlyBuffer = buffer.asReadOnlyBuffer();
        System.out.println(readOnlyBuffer.getChar());

        readOnlyBuffer.position(0);
        readOnlyBuffer.put((byte) 2);
    }
}
Channel
Channel指的是向其写入数据或是从中读取数据的对象,它类似于java.io中的stream。
所有数据的读写都是通过Buffer来进行的,永远不会出现直接向Channel写入数据的情况,或是直接向Channel写入数据的情况,或是直接从Channel读取数据的情况。
与stream不同的是,channel是双向的,一个流只能是InputStream或是OutputStream,Channel打开则可以进行读取、写入或是读写。
由于Channel是双向的,因此它能更好地反映处底层操作系统的真实情况;在Linux系统中,底层操作系统的通道就是双向的。
Selector
在NIO中,一个线程可以处理所有客户端的请求,相关示例:
public class NioTest12 {
    public static void main(String[] args) throws Exception {
        int[] ports = new int[5];
        ports[0] = 5000;
        ports[1] = 5001;
        ports[2] = 5002;
        ports[3] = 5003;
        ports[4] = 5004;

        Selector selector = Selector.open();
        System.out.println(SelectorProvider.provider().getClass());
        for (int i = 0; i < ports.length; i++) {
            ServerSocketChannel serverSocketChannel = ServerSocketChannel.open();
            serverSocketChannel.configureBlocking(false);
            ServerSocket serverSocket = serverSocketChannel.socket();
            InetSocketAddress address = new InetSocketAddress(ports[i]);
            serverSocket.bind(address);
            // 当前状态下必须选择OP_ACCEPT类型
            serverSocketChannel.register(selector, SelectionKey.OP_ACCEPT);
            System.out.println("监听端口: " + ports[i]);
        }
        while (true) {
            int numbers = selector.select();
            System.out.println("numbers: " + numbers);
            Set<SelectionKey> selectionKeys = selector.selectedKeys();
            System.out.println("selectedKeys: " + selectionKeys);
            Iterator<SelectionKey> iter = selectionKeys.iterator();
            while (iter.hasNext()) {
                SelectionKey selectionKey = iter.next();
                if (selectionKey.isAcceptable()) {
                    ServerSocketChannel serverSocketChannel = (ServerSocketChannel) selectionKey.channel();
                    SocketChannel socketChannel = serverSocketChannel.accept();
                    socketChannel.configureBlocking(false);
                    socketChannel.register(selector, SelectionKey.OP_READ);
                    iter.remove();
                    System.out.println("获得客户端连接: " + socketChannel);
                } else if (selectionKey.isReadable()) {
                    SocketChannel socketChannel = (SocketChannel) selectionKey.channel();
                    int bytesRead = 0;
                    while (true) {
                        ByteBuffer byteBuffer = ByteBuffer.allocate(512);
                        byteBuffer.clear();
                        int read = socketChannel.read(byteBuffer);
                        if (read <= 0) {
                            break;
                        }
                        socketChannel.write(byteBuffer);
                        bytesRead += read;
                        System.out.println("读取: " + bytesRead + ",来自于: " + socketChannel);
                        iter.remove();
                    }
                }
            }
        }
    }
}
NIO网络编程
服务端相关的示例:
public class NioServer {
    private static Map<String, SocketChannel> clientMap = new HashMap<>();

    public static void main(String[] args) throws Exception {
        ServerSocketChannel serverSocketChannel = ServerSocketChannel.open();
        // 非阻塞
        serverSocketChannel.configureBlocking(false);
        ServerSocket serverSocket = serverSocketChannel.socket();
        serverSocket.bind(new InetSocketAddress(8899));
        Selector selector = Selector.open();
        // 将serverSocketChannel注册到selector上面
        serverSocketChannel.register(selector, SelectionKey.OP_ACCEPT);
        while (true) {
            try {
                // 将开始阻塞,直到事件发生
                selector.select();
                Set<SelectionKey> selectionKeys = selector.selectedKeys();
                selectionKeys.forEach(selectionKey -> {
                    try {
                        final SocketChannel client;
                        // 表示连接的事件
                        if (selectionKey.isAcceptable()) {
                            ServerSocketChannel server = (ServerSocketChannel) selectionKey.channel();
                            client = server.accept();
                            client.configureBlocking(false);
                            client.register(selector, SelectionKey.OP_READ);
                            String key = "[" + UUID.randomUUID().toString() + "]";
                            clientMap.put(key, client);
                        } else if (selectionKey.isReadable()) {
                            client = (SocketChannel) selectionKey.channel();
                            ByteBuffer readBuffer = ByteBuffer.allocate(1024);
                            int count = client.read(readBuffer);
                            if (count > 0) {
                                readBuffer.flip();
                                Charset charset = StandardCharsets.UTF_8;
                                String receivedMessage = String.valueOf(charset.decode(readBuffer).array());
                                System.out.println(client + ": " + receivedMessage);
                                String sendKey = null;
                                for (Map.Entry<String, SocketChannel> entry : clientMap.entrySet()) {
                                    if (client == entry.getValue()) {
                                        sendKey = entry.getKey();
                                        break;
                                    }
                                }
                                for (Map.Entry<String, SocketChannel> entry : clientMap.entrySet()) {
                                    SocketChannel value = entry.getValue();
                                    ByteBuffer writeBuffer = ByteBuffer.allocate(1024);
                                    writeBuffer.put((sendKey + ": " + receivedMessage).getBytes());
                                    writeBuffer.flip();
                                    value.write(writeBuffer);
                                }
                            }
                        }
                    } catch (Exception ex) {
                        ex.printStackTrace();
                    }
                });
                selectionKeys.clear();
            } catch (Exception ex) {
                ex.printStackTrace();
            }
        }
    }
}
客户端相关的示例:
public class NioClient {
    public static void main(String[] args) throws Exception {
        try {
            SocketChannel socketChannel = SocketChannel.open();
            socketChannel.configureBlocking(false);
            Selector selector = Selector.open();
            socketChannel.register(selector, SelectionKey.OP_CONNECT);
            socketChannel.connect(new InetSocketAddress("127.0.0.1", 8899));
            while (true) {
                selector.select();
                Set<SelectionKey> keySet = selector.selectedKeys();
                for (SelectionKey selectionKey : keySet) {
                    if (selectionKey.isConnectable()) {
                        SocketChannel client = (SocketChannel) selectionKey.channel();
                        if (client.isConnectionPending()) {
                            client.finishConnect();
                            ByteBuffer writeBuffer = ByteBuffer.allocate(1024);
                            writeBuffer.put((LocalDateTime.now() + "连接成功").getBytes());
                            writeBuffer.flip();
                            client.write(writeBuffer);
                            ExecutorService executorService = Executors.newSingleThreadExecutor();
                            executorService.submit(() -> {
                                while (true) {
                                    try {
                                        writeBuffer.clear();
                                        InputStreamReader input = new InputStreamReader(System.in);
                                        BufferedReader br = new BufferedReader(input);
                                        String sendMessage = br.readLine();
                                        writeBuffer.put(sendMessage.getBytes());
                                        writeBuffer.flip();
                                        client.write(writeBuffer);
                                    } catch (Exception ex) {
                                        ex.printStackTrace();
                                    }
                                }
                            });
                        }
                        client.register(selector, SelectionKey.OP_READ);
                    } else if (selectionKey.isReadable()) {
                        SocketChannel client = (SocketChannel) selectionKey.channel();
                        ByteBuffer readBuffer = ByteBuffer.allocate(1024);
                        int count = client.read(readBuffer);
                        if (count > 0) {
                            String receivedMessage = new String(readBuffer.array(), 0, count);
                            System.out.println(receivedMessage);
                        }
                    }
                }
                keySet.clear();
            }
        } catch (Exception ex) {
            ex.printStackTrace();
        }
    }
}
字符编码集
public class NioTest13 {
    public static void main(String[] args) throws Exception {
        String inputFile = "NioTest13_In.txt";
        String outputFile = "NioTest13_Out.txt";
        RandomAccessFile inputRandomAccessFile = new RandomAccessFile(inputFile, "r");
        RandomAccessFile outputRandomAccessFile = new RandomAccessFile(outputFile, "rw");
        long inputLength = new File(inputFile).length();
        FileChannel inputFileChannel = inputRandomAccessFile.getChannel();
        FileChannel outputFileChannel = outputRandomAccessFile.getChannel();
        MappedByteBuffer inputData = inputFileChannel.map(FileChannel.MapMode.READ_ONLY, 0, inputLength);

        System.out.println("==================");
        Charset.availableCharsets().forEach((k,v) -> {
            System.out.println(k + "," + v);
        });

        Charset charset = StandardCharsets.UTF_8;
        // 解码
        CharsetDecoder decoder = charset.newDecoder();
        // 编码
        CharsetEncoder encoder = charset.newEncoder();
        CharBuffer charBuffer = decoder.decode(inputData);
        ByteBuffer outputData = encoder.encode(charBuffer);
        outputFileChannel.write(outputData);
        inputRandomAccessFile.close();
        outputRandomAccessFile.close();
    }
}
ASCII使用7bit来表示一个字符,共计可以表示128种字符,ISO-8859-1使用8bit表示一个字符,即一个字节来表示一个字符,它是完全兼容ASCII的。
GBK是对GB2312,使用两个字节表示一个汉字,GB18030可以表示的汉字的数量是最多的,对于繁体中文,台湾使用BIG5编码。
UNICODE可以表示全世界所有的字符,它统一采用了两个字节表示一个字符,但是会带来存储空间的浪费。
UTF(Unicode Translation Format),Unicode是一种编码方式,而utf则是一种存储方式:UTF-8是Unicode的实现方式之一。
UTF-16LE(little endian),UTF-BE(big endian),Zero Width No-Break Space,0XFEFF(BE),0XFFFE(LE),它们表示不同的BOM(Byte Order Mark)。
UTF-8,变长的表示形式,一般来说,UTF-8会通过1个字节表示一个英文字符,3个字节来表示一个中文,最多可能会使用6个字节来表示一个字符。
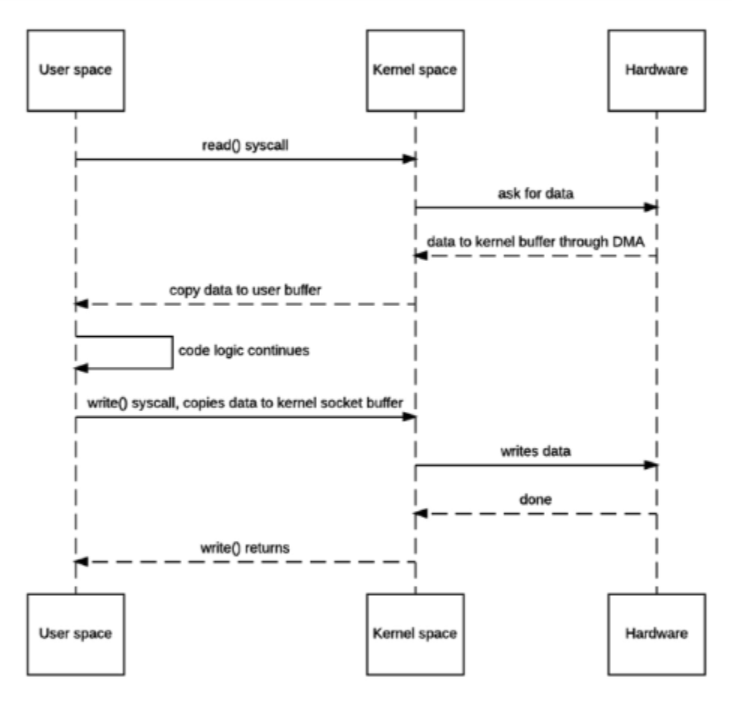
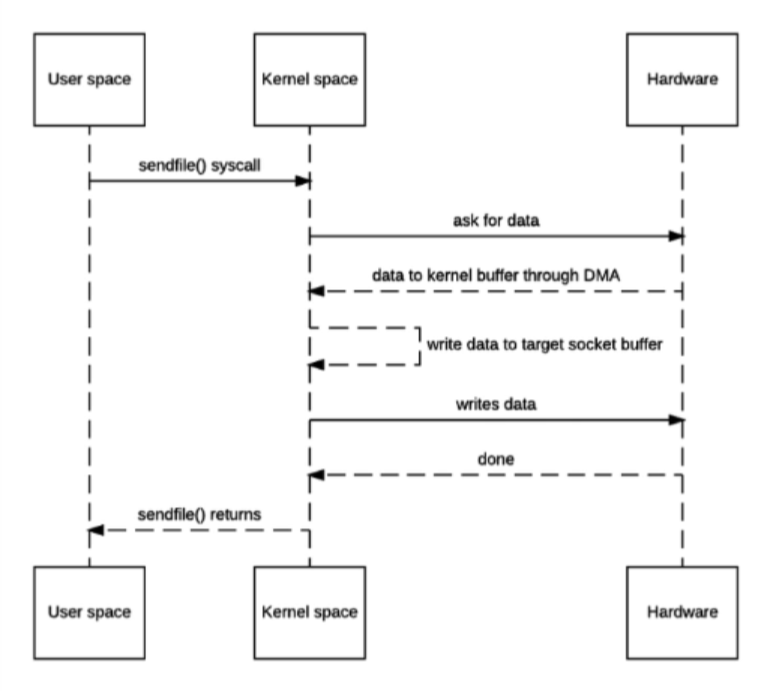
零拷贝
传统的IO流程
零拷贝实现原理
Netty原理分析
EventLoopGroup
EventLoopGroup底层就是一个死循环,然后不停的监听输入与输出的事件。
EventLoopGroup bossGroup = new NioEventLoopGroup(1);
这样表示会启动一个线程来进行,如果没有在参数中指定,那么就会使用默认值:
// 查看系统属性io.netty.eventLoopThreads的值,如果没有就返回可用线程数*2,乘以2的原因是因为CPU的超频技术(如果CPU的核心数是4,那么这个方法返回的就是16)
EFAULT_EVENT_LOOP_THREADS = Math.max(1, SystemPropertyUtil.getInt(
                "io.netty.eventLoopThreads", NettyRuntime.availableProcessors() * 2));
接下来我们需要验证这一点,首先是NioEventLoopGroup的构造方法的调用:
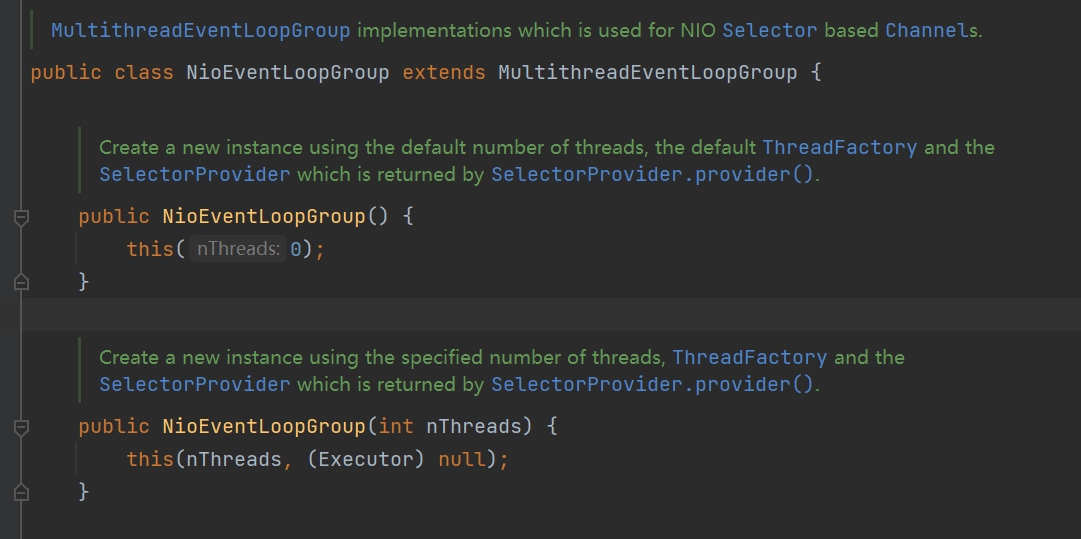
一直找到最终调用的构造方法:

在父类io.netty.channel.MultithreadEventLoopGroup的构造方法中我们可以看到:
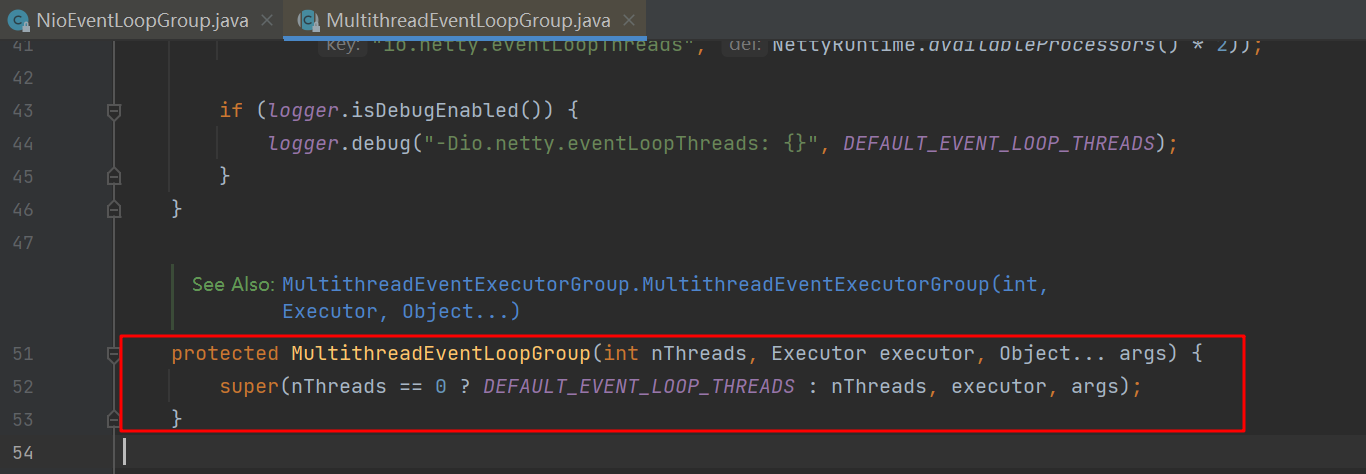
其中DEFAULT_EVENT_LOOP_THREADS:
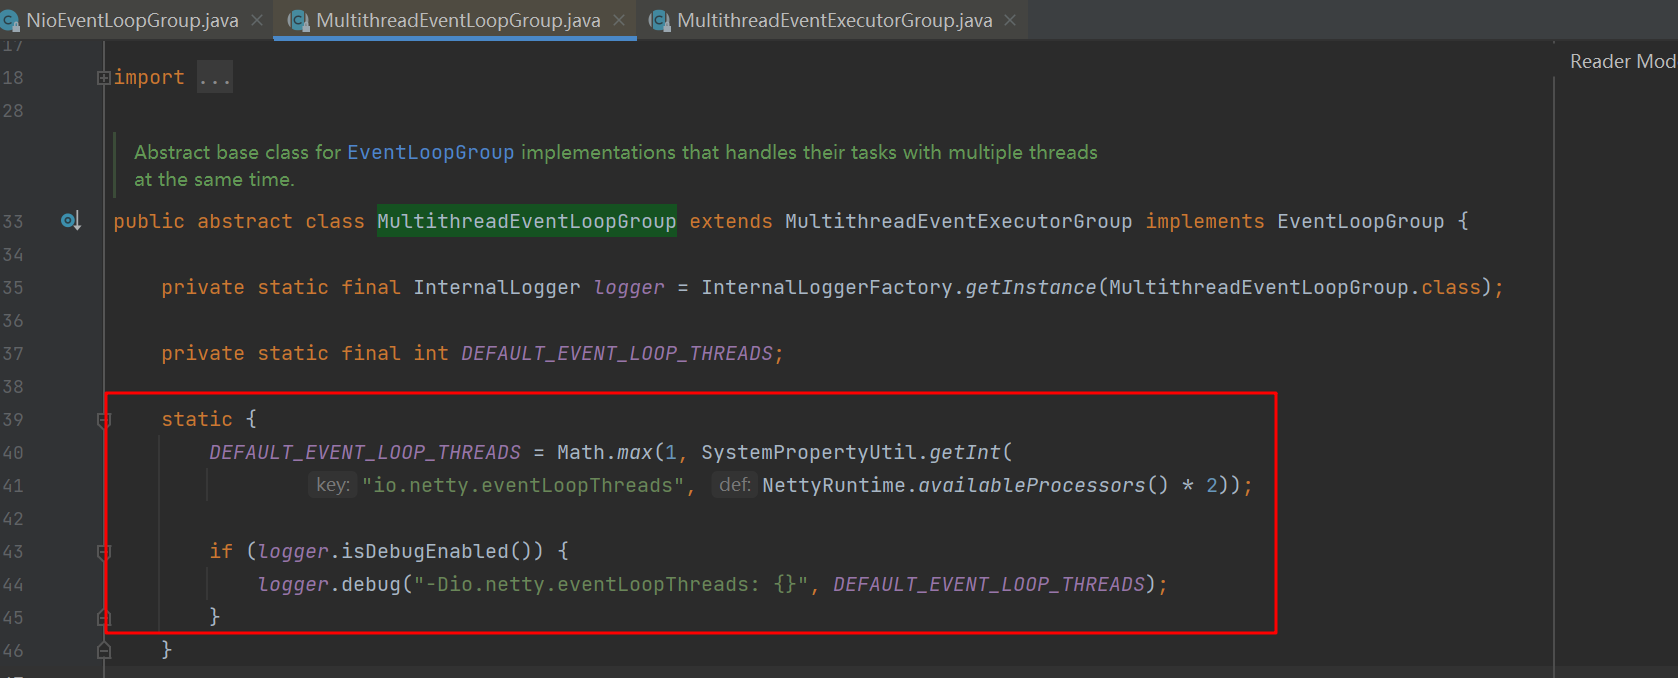
还可以更近一步,再去寻找它的父类就会看到变量赋值的地方:
 protected MultithreadEventExecutorGroup(int nThreads, Executor executor,
                                            EventExecutorChooserFactory chooserFactory, Object... args) {
        checkPositive(nThreads, "nThreads");

        if (executor == null) {
            executor = new ThreadPerTaskExecutor(newDefaultThreadFactory());
        }

        children = new EventExecutor[nThreads];

        for (int i = 0; i < nThreads; i ++) {
            boolean success = false;
            try {
                children[i] = newChild(executor, args);
                success = true;
            } catch (Exception e) {
                // TODO: Think about if this is a good exception type
                throw new IllegalStateException("failed to create a child event loop", e);
            } finally {
                if (!success) {
                    for (int j = 0; j < i; j ++) {
                        children[j].shutdownGracefully();
                    }

                    for (int j = 0; j < i; j ++) {
                        EventExecutor e = children[j];
                        try {
                            while (!e.isTerminated()) {
                                e.awaitTermination(Integer.MAX_VALUE, TimeUnit.SECONDS);
                            }
                        } catch (InterruptedException interrupted) {
                            // Let the caller handle the interruption.
                            Thread.currentThread().interrupt();
                            break;
                        }
                    }
                }
            }
        }

        chooser = chooserFactory.newChooser(children);

        final FutureListener<Object> terminationListener = new FutureListener<Object>() {
            @Override
            public void operationComplete(Future<Object> future) throws Exception {
                if (terminatedChildren.incrementAndGet() == children.length) {
                    terminationFuture.setSuccess(null);
                }
            }
        };

        for (EventExecutor e: children) {
            e.terminationFuture().addListener(terminationListener);
        }

        Set<EventExecutor> childrenSet = new LinkedHashSet<EventExecutor>(children.length);
        Collections.addAll(childrenSet, children);
        readonlyChildren = Collections.unmodifiableSet(childrenSet);
    }
总而言之,通常我们仅需要一个线程来通过不断地循环监听事件的发生,因此通常我们都会指定线程的数量为1,需要注意的是,如果我们没有指定的话,程序会默认使用CPU超频之后的线程数乘以2。
Netty中的Future对象
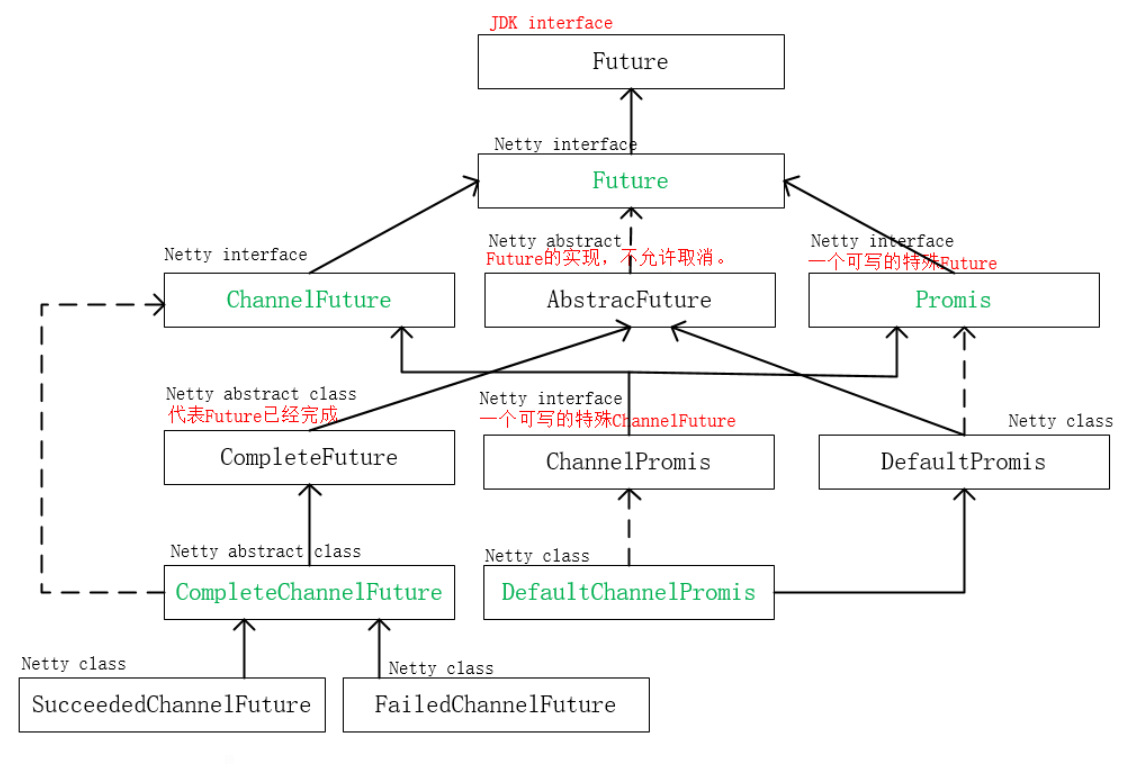
ChannelFuture
netty当中的所有的I/O操作都是异步的,它使用了对于JDK的Future接口的扩展接口io.netty.util.concurrent.Future,更为具体的,在channel当中使用的是io.netty.channel.ChannelFuture。
传统JDK当中的Future接口,在功能上有些局限,例如,想要获取执行的接口,就需要调用get方法,而get方法本身是阻塞的,如果异步任务还没有执行完成,主程序就会陷入阻塞,而Netty当中的Futrue通过观察者模式的使用,巧妙地避免了这一点:
    Future<V> addListener(GenericFutureListener<? extends Future<? super V>> listener);

    Future<V> addListeners(GenericFutureListener<? extends Future<? super V>>... listeners);

    Future<V> removeListener(GenericFutureListener<? extends Future<? super V>> listener);

    Future<V> removeListeners(GenericFutureListener<? extends Future<? super V>>... listeners);
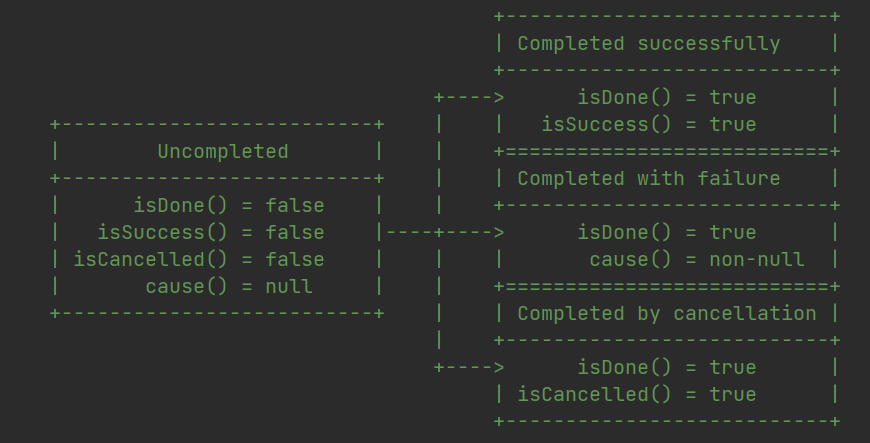
另外,在JDK中的Future接口中,对于任务执行完成的状态也没有进行细分,完成可能是成功执行,也可能抛出了异常,这一点,在Netty中也得到了增强:
异步读写架构
JDK所提供的Future只能通过手工的方式检查执行结果,而这个操作是会阻塞的,Netty则对ChannelFuture进行了增强,通过ChannelFutureListener以回调的方式来获取执行结果,去除了手工检查阻塞的操作,值得注意的是,io.netty.util.concurrent.GenericFutureListener#operationComplete方法是由I/O线程执行的,因此要注意的是不要在这里执行耗时的操作,否则需要通过另外的线程或线程池来执行。
Promise
Promise本身继承了Future,在其基础之上增加了可写的功能(只能写一次),这其实也是一种编程模式,它们之间的关系:https://segmentfault.com/a/1190000023230662。
ServerBootStrap
核心方法
ServerBootstrap中一些常用的方法:
   public ServerBootstrap group(EventLoopGroup parentGroup, EventLoopGroup childGroup) {
        super.group(parentGroup);
        if (this.childGroup != null) {
            throw new IllegalStateException("childGroup set already");
        }
        this.childGroup = ObjectUtil.checkNotNull(childGroup, "childGroup");
        return this;
    }
    public B channel(Class<? extends C> channelClass) {
        return channelFactory(new ReflectiveChannelFactory<C>(
                ObjectUtil.checkNotNull(channelClass, "channelClass")
        ));
    }
    public ServerBootstrap childHandler(ChannelHandler childHandler) {
        this.childHandler = ObjectUtil.checkNotNull(childHandler, "childHandler");
        return this;
    }
可以看到,它们只是完成了一些赋值操作,它们都是为了bind方法准备的,而bind方法实际执行的是doBind方法:
    private ChannelFuture doBind(final SocketAddress localAddress) {
        // 初始化和注册
        final ChannelFuture regFuture = initAndRegister();
        final Channel channel = regFuture.channel();
        if (regFuture.cause() != null) {
            return regFuture;
        }

        if (regFuture.isDone()) {
            // At this point we know that the registration was complete and successful.
            ChannelPromise promise = channel.newPromise();
            doBind0(regFuture, channel, localAddress, promise);
            return promise;
        } else {
            // Registration future is almost always fulfilled already, but just in case it's not.
            final PendingRegistrationPromise promise = new PendingRegistrationPromise(channel);
            regFuture.addListener(new ChannelFutureListener() {
                @Override
                public void operationComplete(ChannelFuture future) throws Exception {
                    Throwable cause = future.cause();
                    if (cause != null) {
                        // Registration on the EventLoop failed so fail the ChannelPromise directly to not cause an
                        // IllegalStateException once we try to access the EventLoop of the Channel.
                        promise.setFailure(cause);
                    } else {
                        // Registration was successful, so set the correct executor to use.
                        // See https://github.com/netty/netty/issues/2586
                        promise.registered();

                        doBind0(regFuture, channel, localAddress, promise);
                    }
                }
            });
            return promise;
        }
    }
初始化和注册方法
其中initAndRegister:
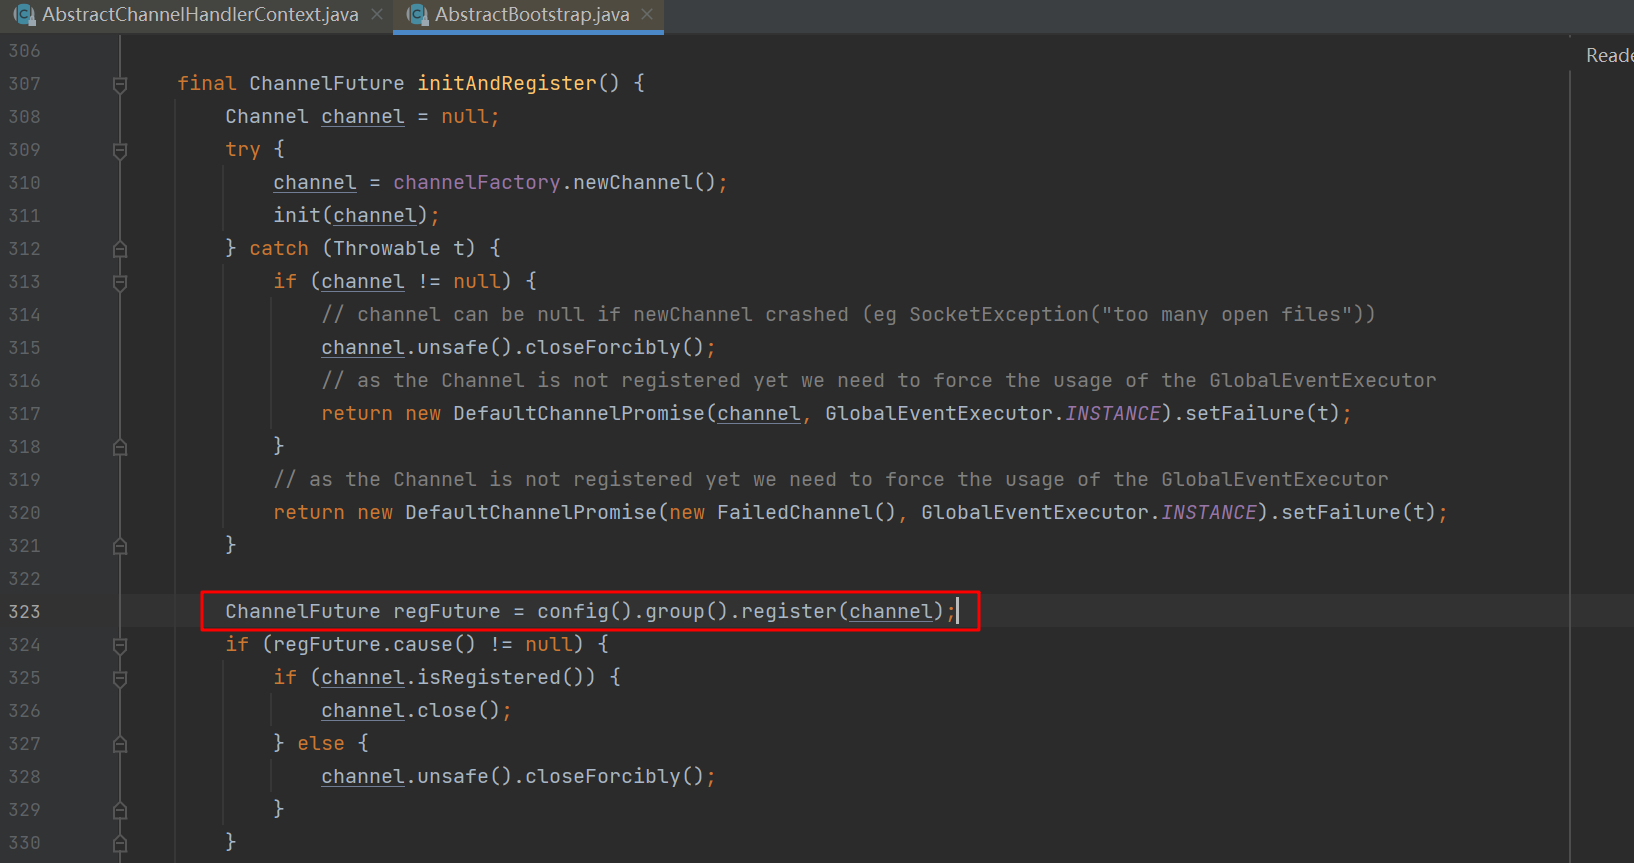
    final ChannelFuture initAndRegister() {
        Channel channel = null;
        try {
            // 作用类似于ThreadFatory,用于创建channel实例
            channel = channelFactory.newChannel();
            init(channel);
        } catch (Throwable t) {
            if (channel != null) {
                channel.unsafe().closeForcibly();
                return new DefaultChannelPromise(channel, GlobalEventExecutor.INSTANCE).setFailure(t);
            }
            return new DefaultChannelPromise(new FailedChannel(), GlobalEventExecutor.INSTANCE).setFailure(t);
        }

        ChannelFuture regFuture = config().group().register(channel);
        if (regFuture.cause() != null) {
            if (channel.isRegistered()) {
                channel.close();
            } else {
                channel.unsafe().closeForcibly();
            }
        }
        return regFuture;
    }
对应的初始化方法:
    @Override
    void init(Channel channel) {
        setChannelOptions(channel, newOptionsArray(), logger);
        setAttributes(channel, newAttributesArray());

        ChannelPipeline p = channel.pipeline();

        final EventLoopGroup currentChildGroup = childGroup;
        final ChannelHandler currentChildHandler = childHandler;
        final Entry<ChannelOption<?>, Object>[] currentChildOptions = newOptionsArray(childOptions);
        final Entry<AttributeKey<?>, Object>[] currentChildAttrs = newAttributesArray(childAttrs);
	   	// 添加默认的初始化器
        p.addLast(new ChannelInitializer<Channel>() {
            @Override
            public void initChannel(final Channel ch) {
                final ChannelPipeline pipeline = ch.pipeline();
                // 添加处理器
                ChannelHandler handler = config.handler();
                if (handler != null) {
                    pipeline.addLast(handler);
                }

                ch.eventLoop().execute(new Runnable() {
                    @Override
                    public void run() {
                        // 添加Acceptor
                        pipeline.addLast(new ServerBootstrapAcceptor(
                                ch, currentChildGroup, currentChildHandler, currentChildOptions, currentChildAttrs));
                    }
                });
            }
        });
    }
Reactor模式
在Netty使用了Reactor模式,Reactor模式也称为反应器模式(注意与响应式模式的区别),与Reactor模式不同的是Proactor模式。
Reactor是对于不同的IO事件使用它所恰当的handler来进行处理的一种编程模型,handlers会绑定到特定的事件上,然后执行一些非阻塞的动作。
传统的模型
经典的客户端与服务器处理模型:
其中每个handler都需要启动一个新的线程进行执行。
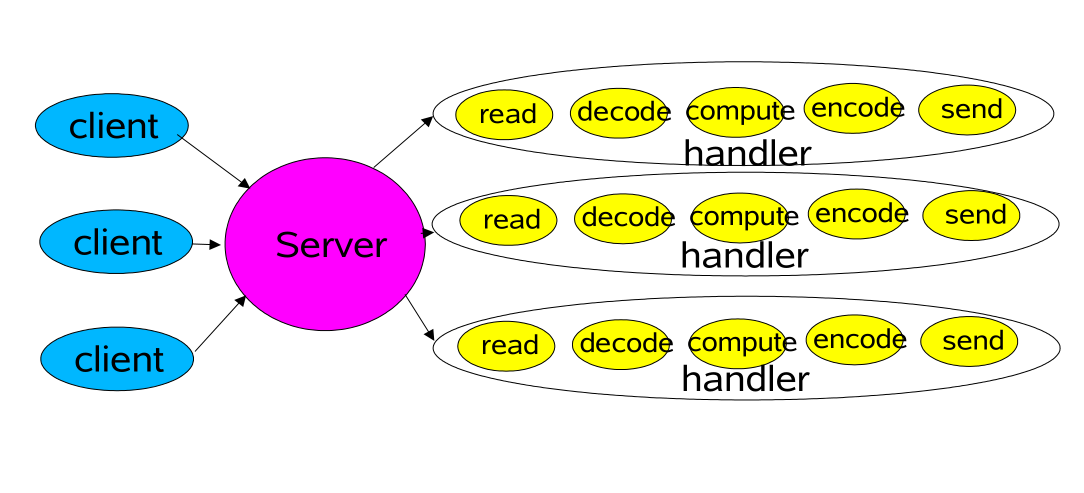
传统模型的优点:
- 编程模型较为简单,适用于请求量不大的场景
传统模型的缺点:
- 服务端能够创建的线程是有限的,如果连接过多就会出现资源不够用的情况
- 当socket连接上之后,但没有数据传输的时候,线程必须持续等待,会造成资源的浪费
Reactor模式
Reactor模式的经典设计如下:
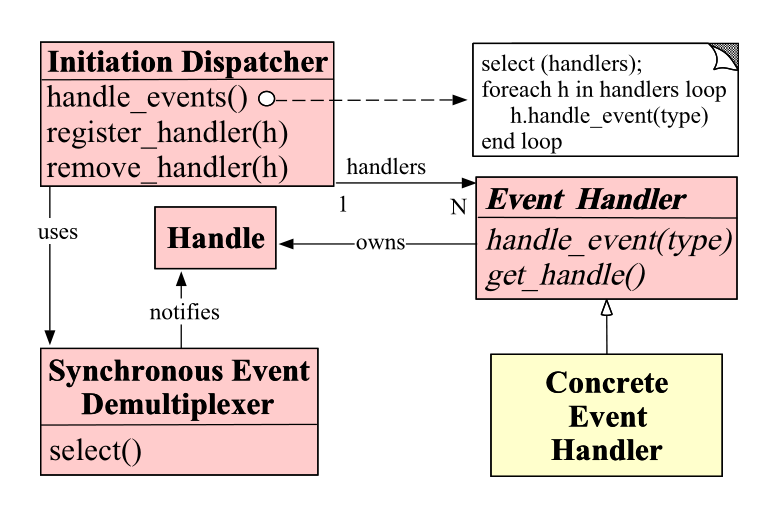
Reactor模式一共有5种角色构成,其含义分别如下:
- Handle(句柄或是描述符):本质上表示一种资源,是由操作系统来提供的,该资源用于表示一个一个的事件,比如文件描述符,或是针对网络编程种的Socket描述符。事件既可以来自于外部,也可以来自于内部;外部事件比如说客户端的连接请求,客户端发送过来数据等;内部事件比如说操作系统产生的定时器事件等。它本质上就是一个文件描述符。Handle本身就是事件产生的发源地
- Synchronous Event Demultiplexer(同步事件分离器):它本身是一个系统调用,用于等待事件的发生(事件可能是一个,也可能是多个)。调用方在调用它的事件会被阻塞,直到同步事件分离器上有事件产生为止。对于Linux来说,同步事件分离器指的就是常用的I/O多路复用的机制,比如说select、poll、epoll等。同步事件分离器对应的组件就是Selector,对应的阻塞方法就是select方法
- Event Handler(事件处理器):本身由多个回调方法构成,这些回调方法构成了与应用相关的对于某个事件的反馈机制。在NIO当中需要自己实现,在Netty当中对应的就是各种内置的handler,为我们提供了大量的回调方法,供我们在特定事件产生时实现相应的回调方法进行业务逻辑的处理
- Concrete Event Handler(具体事件处理器):是事件处理器的实现。它本身实现了事件处理器所提供的各个回调方法,从而实现了特定于业务的逻辑,它本质上就是我们所编写的一个一个的处理器的实现
- Initiation Dispatcher(初始分发器):实际上就是Reactor角色。它本身定义了一些规范,这些规范用于控制事件的调度方式,同时又提供了应用进行事件处理器的注册、删除等设施。它本身是整个事件处理器的核心所在,Initiation Dispatcher会通过同步事件分离器来等待事件的发生,一旦事件发生,Initiation Dispatcher首先会分离出每一个事件,然后调用事件处理器,最后调用相关的回调方法来处理这些事件。
Reactor模式的流程:
- 当应用向Initiation Dispatcher注册具体的事件处理器时,应用会标识出该事件处理器希望Initiation Dispatcher在某个事件发生时向其通知的该事件,该事件与Handle关联
- Initiation Dispatcher会要求每个事件处理器向其传递内部的Handle,该Handle向操作系统标识了事件处理器
- 当所有的事件处理器注册完毕后,应用会调用handle_event方法来启动Initiation Dispatcher的事件循环,这时,Initiation Dispatcher会将每个注册的事件管理器的handle合并起来,并使用同步事件分离器等待这些事件的发生,比如说,TCP协议层会使用select同步事件分离器操作来等待客户端发送的数据到达已经连接的socket handle上
- 当与某个事件源对应handle变为ready状态时(比如说TCP socket变为等待状态时),同步事件分离器就会通知Initiation Dispatcher
- Initiation Dispatcher会触发事件处理器的回调方法,从而响应这个处于ready状态的handle,当事件发生时,Initiation Dispatcher会将被事件源激活的Handle作为【key】来寻找并分发恰当的事件处理器回调方法
- Initiation Dispatcher会回调事件处理器的handle_events回调方法来执行特定于应用的功能(开发者自己所编写的功能),从而响应这个事件,所发生的事件类型可以作为该方法参数并被该方法内部使用执行额外的特定于服务的分离与分发
Netty中的Reactor线程模型
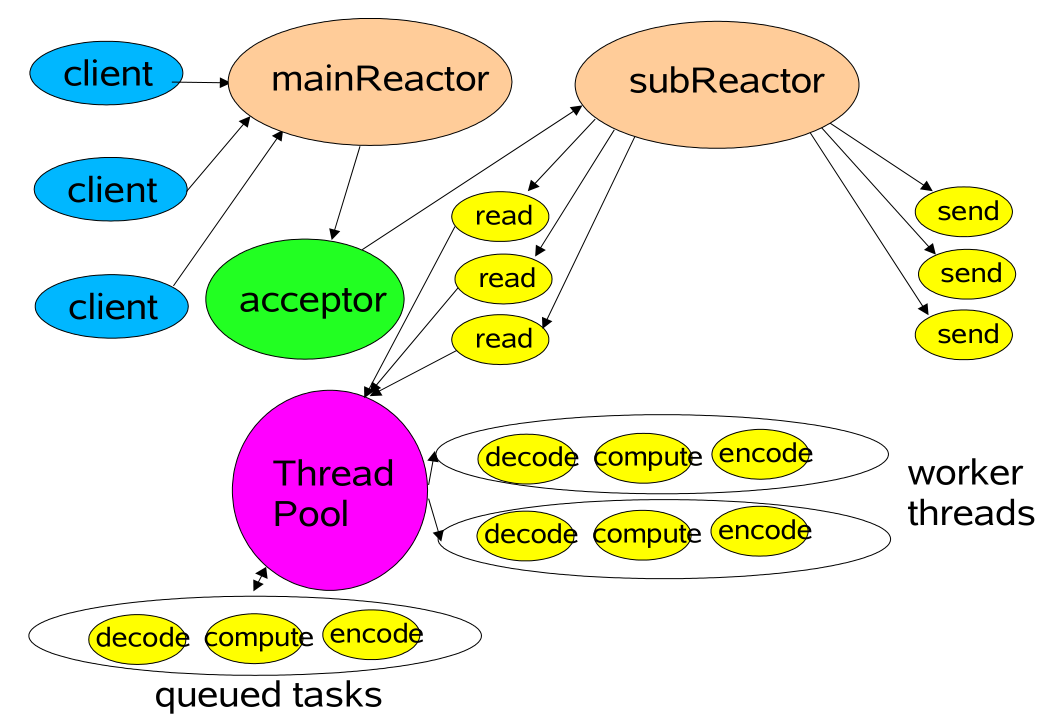
在Netty中,单线程的Reactor的整体设计如下:
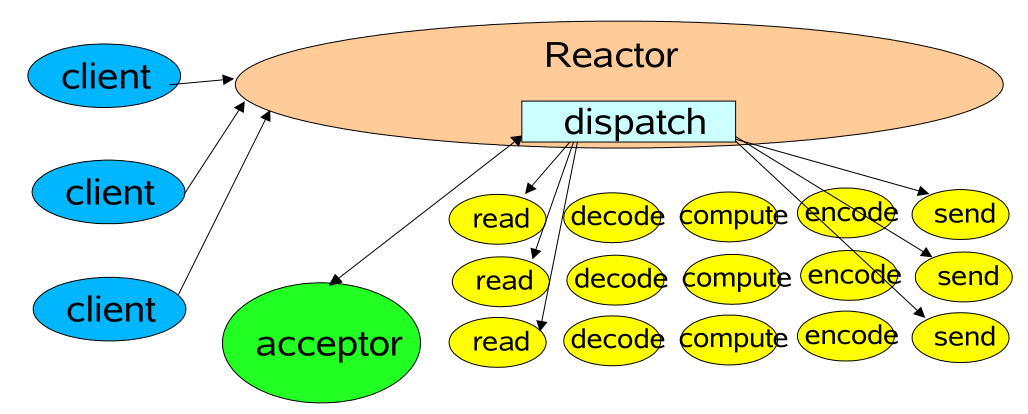
在netty中,EventLoop就是这里的Reactor。
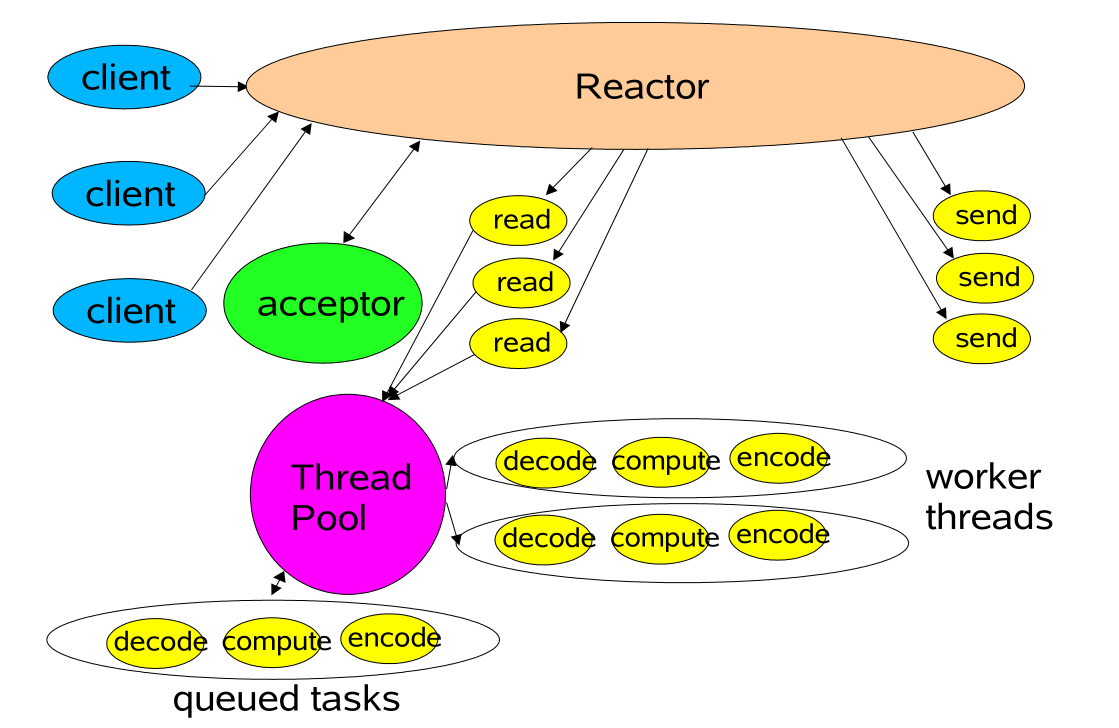
使用线程池的版本:
使用多个Reactor的模型:
自适应缓冲区
在Netty中,分配的ByteBuffer大小并不是每个固定的,Netty会根据用户的行为,对分配缓冲区的大小进行一定程度的预测。
核心API - io.netty.channel.AdaptiveRecvByteBufAllocator
- io.netty.channel.AdaptiveRecvByteBufAllocator#SIZE_TABLE
	// 下一次分配的缓冲区的大小
	private static final int[] SIZE_TABLE;

	static {
        List<Integer> sizeTable = new ArrayList<Integer>();
        for (int i = 16; i < 512; i += 16) {
            sizeTable.add(i);
        }

        // Suppress a warning since i becomes negative when an integer overflow happens
        for (int i = 512; i > 0; i <<= 1) { // lgtm[java/constant-comparison]
            sizeTable.add(i);
        }

        SIZE_TABLE = new int[sizeTable.size()];
        for (int i = 0; i < SIZE_TABLE.length; i ++) {
            SIZE_TABLE[i] = sizeTable.get(i);
        }
    }
分配内存的方法:io.netty.buffer.AbstractByteBufAllocator#ioBuffer(int)
    @Override
    public ByteBuf ioBuffer(int initialCapacity) {
        // 判断当前是否包含sun.misc.Unsafe类
        if (PlatformDependent.hasUnsafe() || isDirectBufferPooled()) {
            // 直接内存
            return directBuffer(initialCapacity);
        }
        // 堆内存
        return heapBuffer(initialCapacity);
    }
Channel实现原理
Channel的四大组件
Channel与ChannelPipeline
Channel可以作为网络套接字的连接点,也可以认为是一个提供了I/O操作(读、写、连接和绑定的)的组件,它提供了如下功能:
- 当前channel的状态(是否已打开连接,是否已成功连接)
- 提供外部化配置功能(可以配置缓冲区的大小)
- 提供了I/O操作(读、写、连接、绑定)
- ChannelPipeline可以处理所有的I/O事件以及与Channel所关联的请求
Channel本身也可以具有层次性,根据Channel创建方式的不同,常见的Channel的类型:
- io.netty.channel.socket.SocketChannel
- io.netty.channel.socket.ServerSocketChannel
在创建Channel的时候,就会在Channel的构造方法中创建与之关联的ChannelPipline:
    protected DefaultChannelPipeline newChannelPipeline() {
        return new DefaultChannelPipeline(this);
    }
具体的实现如下:
    protected DefaultChannelPipeline(Channel channel) {
        this.channel = ObjectUtil.checkNotNull(channel, "channel");
        succeededFuture = new SucceededChannelFuture(channel, null);
        voidPromise =  new VoidChannelPromise(channel, true);
        // AbstractChannelHandlerContext
        tail = new TailContext(this);
        // AbstractChannelHandlerContext
        head = new HeadContext(this);
        // 将前后连接在一起
        head.next = tail;
        tail.prev = head;
    }
可以看到在ChannelPipeline中也维护了一个Channel对象,也就是说,在Channel中可以访问其对应的ChannelPipeline,在ChannelPipeline也可以访问到Channel。
ChannelPipeline是ChannelHander的列表,它用于处理Channel中入栈的事件以及出栈的操作,ChannelPipeline实际上实现了拦截过滤器模式,这里与传统的拦截器/过滤器不同的,对于请求和响应,它可以只处理其中的一个,如果只是入栈过滤器,那么只处理请求,如果只是出栈的处理器,那么只处理响应。
每一个Channel都会有自己的ChannelPipeline,ChannelPipeline的工作流程如下:
                                       I/O Request via Channel or ChannelHandlerContext
                                                                |
            +---------------------------------------------------+---------------+
            |                           ChannelPipeline         |               |
            |                                                  \|/              |
            |    +---------------------+            +-----------+----------+    |
            |    | Inbound Handler  N  |            | Outbound Handler  1  |    |
            |    +----------+----------+            +-----------+----------+    |
            |              /|\                                  |               |
            |               |                                  \|/              |
            |    +----------+----------+            +-----------+----------+    |
            |    | Inbound Handler N-1 |            | Outbound Handler  2  |    |
            |    +----------+----------+            +-----------+----------+    |
            |              /|\                                  .               |
            |               .                                   .               |
            | ChannelHandlerContext.fireIN_EVT() ChannelHandlerContext.OUT_EVT()|
            |        [ method call]                       [method call]         |
            |               .                                   .               |
            |               .                                  \|/              |
            |    +----------+----------+            +-----------+----------+    |
            |    | Inbound Handler  2  |            | Outbound Handler M-1 |    |
            |    +----------+----------+            +-----------+----------+    |
            |              /|\                                  |               |
            |               |                                  \|/              |
            |    +----------+----------+            +-----------+----------+    |
            |    | Inbound Handler  1  |            | Outbound Handler  M  |    |
            |    +----------+----------+            +-----------+----------+    |
            |              /|\                                  |               |
            +---------------+-----------------------------------+---------------+
                            |                                  \|/
            +---------------+-----------------------------------+---------------+
            |               |                                   |               |
            |       [ Socket.read() ]                    [ Socket.write() ]     |
            |                                                                   |
            |  Netty Internal I/O Threads (Transport Implementation)            |
            +-------------------------------------------------------------------+
通常情况下,一个事件的传播是如下进行的:
   public class MyInboundHandler extends ChannelInboundHandlerAdapter {
        @Override
       public void channelActive(ChannelHandlerContext ctx) {
           System.out.println("Connected!");
           ctx.fireChannelActive();
       }
   }

   public class MyOutboundHandler extends ChannelOutboundHandlerAdapter {
        @Override
       public void close(ChannelHandlerContext ctx, ChannelPromise promise) {
           System.out.println("Closing ..");
           ctx.close(promise);
       }
   }
在之前的示例中,我们都是直接在handler中编写业务的相关逻辑,然后这仅仅适用于我们的处理不耗时的情况,如果要防止程序阻塞,那么就需要使用ChannelPipeline中另一个重载的方法:
// EventExecutorGroup
pipeline.addLast(group, "handler", new MyBusinessLogicHandler());
当然也可以在我们自己的处理器中使用线程池相关的技术来实现异步执行。
ChannelOption与AttributeKey
ChannelOption可以让我们以类型安全的方式配置ChannelConfig。它主要通过ConstantPool来维护常量池。ChannelOption主要维护TCP等与协议相关的常量,而AttributeKey主要维护与业务相关的常量。
ChannelHandler与ChannelHandlerContext
ChannelHandlerContext是ChannelHandler与ChannelPipeline之间交互的桥梁和纽带。
io.netty.channel.ChannelPipeline#addLast(io.netty.channel.ChannelHandler...)方法的实现:
    public final ChannelPipeline addLast(EventExecutorGroup group, String name, ChannelHandler handler) {
        final AbstractChannelHandlerContext newCtx;
        synchronized (this) {
            checkMultiplicity(handler);

            newCtx = newContext(group, filterName(name, handler), handler);

            addLast0(newCtx);

            // If the registered is false it means that the channel was not registered on an eventLoop yet.
            // In this case we add the context to the pipeline and add a task that will call
            // ChannelHandler.handlerAdded(...) once the channel is registered.
            if (!registered) {
                newCtx.setAddPending();
                callHandlerCallbackLater(newCtx, true);
                return this;
            }

            EventExecutor executor = newCtx.executor();
            if (!executor.inEventLoop()) {
                callHandlerAddedInEventLoop(newCtx, executor);
                return this;
            }
        }
        callHandlerAdded0(newCtx);
        return this;
    }
ChannelHandler既可以通知下一个ChannelHandler,也可以修改它所属的ChannelPipline对象,可以通过ChannelPipline中提供若干方法获取最近的ChannelHandler。
我们可以提前将ChannelHandlerContext保存起来,然后在需要的时候调用:
   public class MyHandler extends ChannelDuplexHandler {

       private ChannelHandlerContext ctx;

       public void beforeAdd(ChannelHandlerContext ctx) {
           this.ctx = ctx;
       }

       public void login(String username, password) {
           ctx.write(new LoginMessage(username, password));
       }
       ...
   }
一个ChannelHandler可以拥有多个ChannelHandlerContext,一个ChannelHandler也可以被多次添加到一个ChannelPipline中。
在Netty4.1以后的版本中,ChannelHandlerContext#attr与Channel#attr方法的作用域是相同的:
Channel选择器
核心API - io.netty.util.concurrent.EventExecutorChooserFactory.EventExecutorChooser
EventExecutorChooserFactory使用round-robin来选择下一个EventExecutor,Netty会根据EventExecutor中数组的长度来选择不同的事件执行器。
    @Override
    public EventExecutorChooser newChooser(EventExecutor[] executors) {
        if (isPowerOfTwo(executors.length)) {
            return new PowerOfTwoEventExecutorChooser(executors);
        } else {
            return new GenericEventExecutorChooser(executors);
        }
    }
其中两个选择器的实现:
    private static final class PowerOfTwoEventExecutorChooser implements EventExecutorChooser {
        private final AtomicInteger idx = new AtomicInteger();
        private final EventExecutor[] executors;

        PowerOfTwoEventExecutorChooser(EventExecutor[] executors) {
            this.executors = executors;
        }

        @Override
        public EventExecutor next() {
            // 直接返回索引,如果是2的倍数,与的操作性能会更高
            return executors[idx.getAndIncrement() & executors.length - 1];
        }
    }

    private static final class GenericEventExecutorChooser implements EventExecutorChooser {

        private final AtomicLong idx = new AtomicLong();
        private final EventExecutor[] executors;

        GenericEventExecutorChooser(EventExecutor[] executors) {
            this.executors = executors;
        }

        @Override
        public EventExecutor next() {
            // 取模
            return executors[(int) Math.abs(idx.getAndIncrement() % executors.length)];
        }
    }
}
Channel注册流程
首先来看config方法的实现:
    @Override
    public final ServerBootstrapConfig config() {
        return config;
    }
group方法:
    public final EventLoopGroup group() {
        return bootstrap.group();
    }
register方法:
    @Override
    public ChannelFuture register(Channel channel) {
        return next().register(channel);
    }
查看调用栈即可找到:
        @Override
        public final void register(EventLoop eventLoop, final ChannelPromise promise) {
            ObjectUtil.checkNotNull(eventLoop, "eventLoop");
            if (isRegistered()) {
                promise.setFailure(new IllegalStateException("registered to an event loop already"));
                return;
            }
            if (!isCompatible(eventLoop)) {
                promise.setFailure(
                        new IllegalStateException("incompatible event loop type: " + eventLoop.getClass().getName()));
                return;
            }

            AbstractChannel.this.eventLoop = eventLoop;
            // 这个判断的原因是防止产生并发问题,如果判断为假,会将任务提交给eventLoop中的Thread去执行
            if (eventLoop.inEventLoop()) {
                register0(promise);
            } else {
                try {
                    eventLoop.execute(new Runnable() {
                        @Override
                        public void run() {
                            register0(promise);
                        }
                    });
                } catch (Throwable t) {
                    logger.warn(
                            "Force-closing a channel whose registration task was not accepted by an event loop: {}",
                            AbstractChannel.this, t);
                    closeForcibly();
                    closeFuture.setClosed();
                    safeSetFailure(promise, t);
                }
            }
        }
Netty当中几个重要的原则:
- 一个EventLoopGroup当中会包含一个或多个EventLoop
- 一个EventLoop在它的整个生命周期中只会与唯一一个Thread进行绑定
- 所有由EventLoop所处理的各种I/O事件都将在它所关联的那个Thread上进行处理
- 一个Channel在它的整个生命周期中只会注册在一个EventLoop上
- 一个EventLoop在运行过程当中,会被分配给一个或者多个Channel
真正的注册的方法实际上在io.netty.channel.nio.AbstractNioChannel#doRegister:
    protected void doRegister() throws Exception {
        boolean selected = false;
        for (;;) {
            try {
                // 真正的注册实际上就是对于Nio的处理(javaChannel就是SelectableChannel)
                selectionKey = javaChannel().register(eventLoop().unwrappedSelector(), 0, this);
                return;
            } catch (CancelledKeyException e) {
                if (!selected) {
                    // Force the Selector to select now as the "canceled" SelectionKey may still be
                    // cached and not removed because no Select.select(..) operation was called yet.
                    eventLoop().selectNow();
                    selected = true;
                } else {
                    // We forced a select operation on the selector before but the SelectionKey is still cached
                    // for whatever reason. JDK bug ?
                    throw e;
                }
            }
        }
    }
Netty中的设计原则
设计原则
在Netty中,Channel的实现一定是线程安全的,基于此,我们可以存储一个Channel引用,并且在需要向远程端点发送数据时,通过这个引用来调用Channel相应的方法,即便当时有很多线程都在使用它也不会出现多线程问题,而且消息一定会按照顺序发送出去。
业务线程池
在业务开发中,不要将长时间执行的耗时任务放入到EventLoop的执行队列中,因为它将会一直阻塞该线程所对应的所有Channel上的其他执行任务,如果我们需要进行阻塞调用或是耗时的操作(实际开发中很常见),那么我们就需要使用一个专门的EventExecutor(业务线程池)。
业务线程池通过会有两种实现的方式:
- 在ChannelHandler的回调方法中,使用自己定义的业务线程池,这样就可以实现异步的调用
- 借助Netty提供的向ChannelPipline添加Channel时调用的addLast方法来传递EventExecutor
默认情况下(调用addLast(handler),ChannelHandler中的回调方法都是由I/O线程所执行,如果调用了ChannelPipline#addLast(EventExectorGroup group,Channel...handlers)方法,那么ChannelHandler中的回调方法就是由参数中的group线程组来执行。
ByteBuf实现原理
ByteBuffer的compact方法:
- 将所有维度的数据复制到buffer的起始位置处
- 将position设为最后一个未读的元素的后面
- 将limit设置为capacity
- 现在buffer就准备好了,但是不会覆盖未读的数据
ByteBuf使用示例
public class ByteBufTest0 {
    public static void main(String[] args) {
        ByteBuf byteBuf = Unpooled.buffer(10);
        for (int i = 0; i < 10; i++) {
            byteBuf.writeByte(i);
        }
        for (int i = 0; i < byteBuf.capacity(); i++) {
            System.out.println(byteBuf.getByte(i));
        }
    }
}
核心API的使用示例:
public class ByteBufTest1 {
    public static void main(String[] args) {
        ByteBuf byteBuf = Unpooled.copiedBuffer("吉hello world", StandardCharsets.UTF_8);
        // 如果这个判断成立,说明创建的ByteBuf就是堆上的缓冲
        if (byteBuf.hasArray()) {
            byte[] content = byteBuf.array();
            System.out.println(new String(content, StandardCharsets.UTF_8));

            System.out.println(byteBuf);
            // 第一个字节的偏移量,通常情况下为0
            System.out.println(byteBuf.arrayOffset());
            System.out.println(byteBuf.readerIndex());
            System.out.println(byteBuf.writerIndex());
            System.out.println(byteBuf.capacity());

            int length = byteBuf.readableBytes();
            System.out.println(length);

            for (int i = 0; i < byteBuf.readableBytes(); i++) {
                System.out.println((char) byteBuf.getByte(i));
            }

            System.out.println(byteBuf.getCharSequence(0, 4, StandardCharsets.UTF_8));
        }
    }
}
ByteBuf数据结构
ByteBuf提供了两个指针变量来进行数据的读写,分别是readerIndex(读操作)和writerIndex(写操作),这两个指针将整个ByteBuf分为了三个部分:
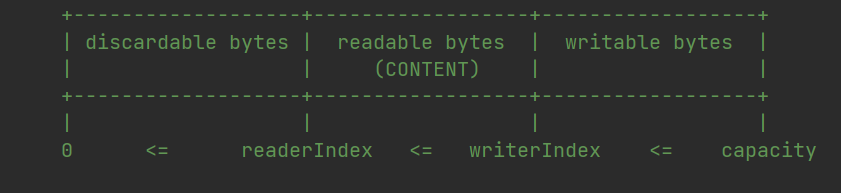
核心API:
- io.netty.buffer.ByteBuf#discardReadBytes
- io.netty.buffer.ByteBuf#clear
使用Derived buffers生成的新的ByteBuf是一种浅拷贝,它们的readerIndex和writerIndex是独立,但是底层的数据是同一份,如果需要深拷贝,可以使用io.netty.buffer.ByteBuf#copy()。
ByteBuf可以和ByteBuffer互相进行转换,与JDK中的ByteBuffer不同的是,ByteBuf除了有Heap缓冲区和直接内存缓冲区,还有复合缓冲区。
通过索引来访问Byte时并不会改变真实的读索引与写索引,我们可以通过ByteBuf的readerIndex()与writerIndex()方法分别直接修改读索引与写索引。
ByteBuf的底层实现:UnpooledByteBufAllocator$InstrumentedUnpooledUnsafeHeapByteBuf(ridx: 0, widx: 11, cap: 64)。
复合缓冲区
Netty ByteBuf所提供的3中缓冲区类型:
- heap buffer
- direct buffer
- composite buffer
不同缓冲区之间的区别如下表:
| 类型 | 特点 | 优点 | 缺点 |
|---|---|---|---|
| Heap Buffer(堆缓冲区) | 这是最常用的类型,ByteBuf将数据存储到JVM的堆空间中,并且将实际的数据存放到byte array中来实现的 | 由于数据是存储在JVM堆中的,因此可以快速的创建于快速的释放,并且提供了直接访问内部字节数组的方法 | 每次读写数据时,都需要先将数据复制到直接缓冲区中再进行网络传输 |
| Direct Buffer(直接缓冲区) | 在堆之外直接分配的内存空间,直接缓冲区并不会占用堆的容量空间,因为它是由操作系统在本地内存进行的数据分配 | 在使用Socket进行数据传输时,性能非常好,因为数据直接位于操作系统的本地内存中,所以不需要从JVM将数据复制到直接缓冲区,性能很好 | 由于Direct Buffer是直接在操作系统内存中的,所以内存空间的分配与释放要比堆空间更加复杂,而且速度要慢一些 |
| Composite buffer(复合缓冲区) |
直接缓冲区并不支持通过字节数组的方式来访问数据。对于后端的业务消息的编解码来说,推荐使用HeapByteBuf;对于I/O通信线程在读写缓冲区时,推荐使用DirectByteBuf。
JDK的ByteBuffer与Netty的ByteBuf之间的差异对比:
- Netty的ByteBuf采用了读写索引分离的策略(readerIndex和writerIndex),一个初始化(里面尚未有任何数据)的ByteBuf的readerIndex和writerIndex值都为0
- 当读索引与写索引处于同一个位置时,如果我们继续读取,那么就会抛出IndexOutOfBoundsException
- 对于ByteBuf的任何读写操作都会分别单独维护读索引和写索引。maxCapacity最大容量默认的限制就是Integer.MAX_VALUE。
JDK的ByteBuffer的缺点:
final byte[] bb;这是JDK的ByteBuffer对象中用于存储数据的对象声明;可以看到,其字节数组是被声明为final的,也就是长度是固定不变的。一旦分配好不能动态扩容与收缩;而且当待存储的数据字节很大时就很有可能出现IndexOutOfBoundsException,如果要预防这个异常,那就需要存储之前确定好待存储的字节大小。如果ByteBuffer的空间不足,我们只有一种解决方案:创建一个全新的ByteBuffer对象,然后再将之前的ByteBuffer中的数据复制过去,这一切操作都需要由开发者自己来手动完成- ByteBuffer只使用一个position指针来标识位置信息,在进行读写切换时就需要调用flip方法就是rewind方法,使用起来很不方便
Netty的ByteBuf的优点:
- 存储字节的数组时动态的,其最大值默认是Integer.Max_VALUE。这里的动态性是体现在write方法中的,write方法在执行时会判断buffer容量,如果不足则自动扩容
- ByteBuf的读写索引是完全分开的,使用起来相对方便
引用计数
实现原理
Netty为了性能的考虑,并没有直接使用JVM的GC技术,而是借助于引用计数来实现池化的管理。每一个新创建的对象的引用计数对象的数量就是1,对于池化的ByteBuf,使用完成之后,就会被放回到对象池中,对于非池化的ByteBuf在使用完成之后,就会被GC回收。
核心API - io.netty.util.ReferenceCounted
核心方法:
- io.netty.util.ReferenceCounted#retain
- io.netty.util.ReferenceCounted#release
如果觉得管理引用比较麻烦,可以使用工具类方法:
- io.netty.util.ReferenceCountUtil#retain
- io.netty.util.ReferenceCountUtil#release
引用计数的自旋锁的实现:
    public int getAndAdd(T obj, int delta) {
        int prev, next;
        do {
            prev = get(obj);
            next = prev + delta;
        } while (!compareAndSet(obj, prev, next));
        return prev;
    }
原子更新的底层实现:java.util.concurrent.atomic.AtomicIntegerFieldUpdater
AtomicIntegerFieldUpdater
非原子性的更新int类型的字段:
public class AtomicUpdaterTest {
    public static void main(String[] args) throws Exception{
        Person person = new Person();
        for (int i = 0; i < 10; i++) {
            Thread thread = new Thread(() -> {
                try {
                    Thread.sleep(200);
                } catch (InterruptedException e) {
                    e.printStackTrace();
                }
                System.out.println(person.age++);
            });
            thread.start();
        }
    }
}

class Person {
    int age = 1;
}
程序运行结果:
> Task :AtomicUpdaterTest.main()
4
1
5
6
2
7
2
3
1
8
可以看到更新并不是原子性的,接下来使用AtomicIntegerFieldUpdater:
public class AtomicUpdaterTest {
    public static void main(String[] args) throws Exception {
        Person person = new Person();
        AtomicIntegerFieldUpdater<Person> atomicIntegerFieldUpdater = AtomicIntegerFieldUpdater.newUpdater(Person.class, "age");
        for (int i = 0; i < 10; i++) {
            Thread thread = new Thread(() -> {
                try {
                    Thread.sleep(200);
                } catch (InterruptedException e) {
                    e.printStackTrace();
                }
                System.out.println(atomicIntegerFieldUpdater.getAndIncrement(person));
            });
            thread.start();
        }
    }
}

class Person {
    // 注意必须是volatile类型的
    volatile int age = 1;
}
AtomicIntegerFieldUpdater要点:
- 更新器更新的必须是int类型的变量,不能是其包装类型
- 更新器所更新的必须是volatile类型变量,确保线程之间共享变量时立即可见性
- 变量不能是static的,必须是要是实例变量,因为Unsafe.objectFieldOffset()方法不支持静态变量(CAS操作本质上是通过对象实例的偏移量来直接进行赋值)
- 更新器只能修改它可见范围内的变量,因为更新器是通过反射来得到这个变量,如果变量不可见就会报错
如果要更新的变量是包装类型,那么可以使用AtomicReferenceFieldUpdater来进行原子更新的操作。
Netty中并没有使用AtomicInteger的原因是,在Netty中会创建大量的ByteBuf,每一个ByteBuf都需要创建一个AtomicInteger对象,但是使用AtomicReferenceFieldUpdater仅需要创建一个实例,就可以对所有的ByteBuf进行原子更新,处于性能的考虑,就没有使用AtomicInteger了。
Netty中的处理器
Netty中的处理器可以分为两类:入站处理器与出站处理器,入站处理器的顶层是ChannelInboundHandler,出战处理器的顶层是ChannelOutboundHandler。数据处理时常用的各种编解码器本质上都是处理器。
无论我们向网络中写入的数据是什么类型(int、char、String、二进制等),数据在网络中传递时,其都是以字节流的形式呈现的;将数据由原本的形式转换为字节流的操作称为编码(encode),将数据由字节转换为它原本的格式或是其他格式的操作称为解码(decode)。编解码统一称为codec。
对于编码来说本质上是一种出站处理器,因此,编码一定是ChannelOutboundHandler;对于解码本质上是一种入站处理器,因此,解码一定是一种ChannelInboundHandler。
在Netty中,编码器通常以×××Encoder命名;解码器通常以×××Decoder命名。
无论是编码器还是解码器,其所接收的消息类型必须要与待处理的参数类型一致,否则该编码器或解码器并不会被执行。在解码器进行数据解码时,一定记得判断缓冲(ByteBuf)中的数据是否足够使用。
自定义编解码器
核心API - io.netty.handler.codec.ByteToMessageDecoder
自定义解码器的示例:
/**
 * 自定义解码器
 */
public class MyByteToLongDecoder extends ByteToMessageDecoder {
    @Override
    protected void decode(ChannelHandlerContext channelHandlerContext, ByteBuf byteBuf, List<Object> list) throws Exception {
        System.out.println("decode invoked!");
        System.out.println(byteBuf.readableBytes());

        if (byteBuf.readableBytes() >= 8) {
            list.add(byteBuf.readLong());
        }
    }
}
自定义编码器的示例:
/**
 * 自定义编码器
 */
public class MyLongToByteEncoder extends MessageToByteEncoder<Long> {
    @Override
    protected void encode(ChannelHandlerContext channelHandlerContext, Long msg, ByteBuf byteBuf) throws Exception {
        System.out.println("encode invoked!");
        System.out.println(msg);
        byteBuf.writeLong(msg);
    }
}
ReplayingDecoder
ReplayingDecoder和ByteToMessageDecoder最主要的区别在于使用ReplayingDecoder的decode或者decodeLast方法的时候就好像所有的字节都已经被接收到了一样,而不必检查字节是否存在或者缺少,这在自定义协议的场景下非常的有用。
使用ReplayingDecoder也可以完成上面例子的功能:
public class MyByteToLongDecoder2 extends ReplayingDecoder<Void> {
    @Override
    protected void decode(ChannelHandlerContext channelHandlerContext, ByteBuf byteBuf, List<Object> list) throws Exception {
        System.out.println("MyByteToLongDecoder2 decode invoked");
        list.add(byteBuf.readLong());

    }
}
LengthFieldBasedFrameDecoder
这个解码器会根据接收到的消息的长度,对ByteBuf动态的进行分割,如果要解码一个由header和body两部分组成的二进制的消息的时候,会非常有用,通常在自定义协议的时候,就可以使用这个类。
常见编解码器总结
- io.netty.handler.codec.MessageToMessageDecoder
- io.netty.handler.codec.MessageToMessageEncoder
- io.netty.handler.codec.MessageToMessageDncoder(编解码器)
- io.netty.handler.codec.MessageToMessageEncoder(编解码器)
- io.netty.channel.CombinedChannelDuplexHandler(组合的编解码器)
- io.netty.handler.codec.LineBasedFrameDecoder
- io.netty.handler.codec.FixedLengthFrameDecoder
- io.netty.handler.codec.DelimiterBasedFrameDecoder
- io.netty.handler.codec.LengthFieldBasedFrameDecoder
TCP粘包与拆包
粘包与拆包
TCP是面向连接的,面向字节流的,提供可靠交互。发送端为了提高发送效率,使用了Nagle算法,将多次间隔较小且数据量小的数据,合并成一个大的数据块,然后进行封包。这样做虽然提高了效率,但是接收端就难以分辨出完整的数据包了,因为面向流的通信是无消息保护边界的。
TCP的粘包是指,将多个小的包封装成一个大的数据包发送,发送方发送的若干数据包到接收方时粘成了一个包。
TCP的拆包是指,将一个完整的包拆分成为多个小包进行发送,发送方发送一个数据包到接收方时被拆分为若干个小包。
解决方案
Netty会不断的从TCP缓冲区中读取数据,每次读取完都需要判断是否是一个完整的数据包:
- 如果当前读取的数据不足以拼接成一个完整的业务数据包,那就保留该数据,继续从tcp缓冲区中读取,直到得到一个完整的数据包
- 如果当前读到的数据加上已经读取的数据足够拼接成一个数据包,那就将已经读取的数据拼接上本次读取的数据,构成一个完整的业务数据包传递到业务逻辑,多余的数据仍然保留,以便和下次读到的数据尝试拼接
判断是一个完整的数据包的依据:
- 设置定长消息(对应Netty提供的FixedLengthFrameDecoder解码器)
- 设置消息边界(分隔符,对应Netty提供的DelimiterBasedFrameDecoder解码器)
- 使用带消息头的协议,消息头存储消息开始标识及消息的长度信息Header+Body(使用Netty提供的LengthFieldBasedFrameDecoder)
- 发送消息长度,自定义消息编解码器
Netty中的设计模式
观察者模式
核心API:io.netty.util.concurrent.Future
实现原理:

适配器模式
核心API - io.netty.channel.ChannelInboundHandlerAdapter
提供的实现类将我们所需要实现的接口中的方法全都实现出来,那么在实现具体的类的时候,就无须重写接口中的所有的方法。
常用的实现:
- io.netty.channel.SimpleChannelInboundHandler
SimpleChannelInboundHandler会在消息消费完成之后自动的调用ReferenceCountUtil.release(msg)方法。
模板方法模式
核心API - io.netty.channel.SimpleChannelInboundHandler
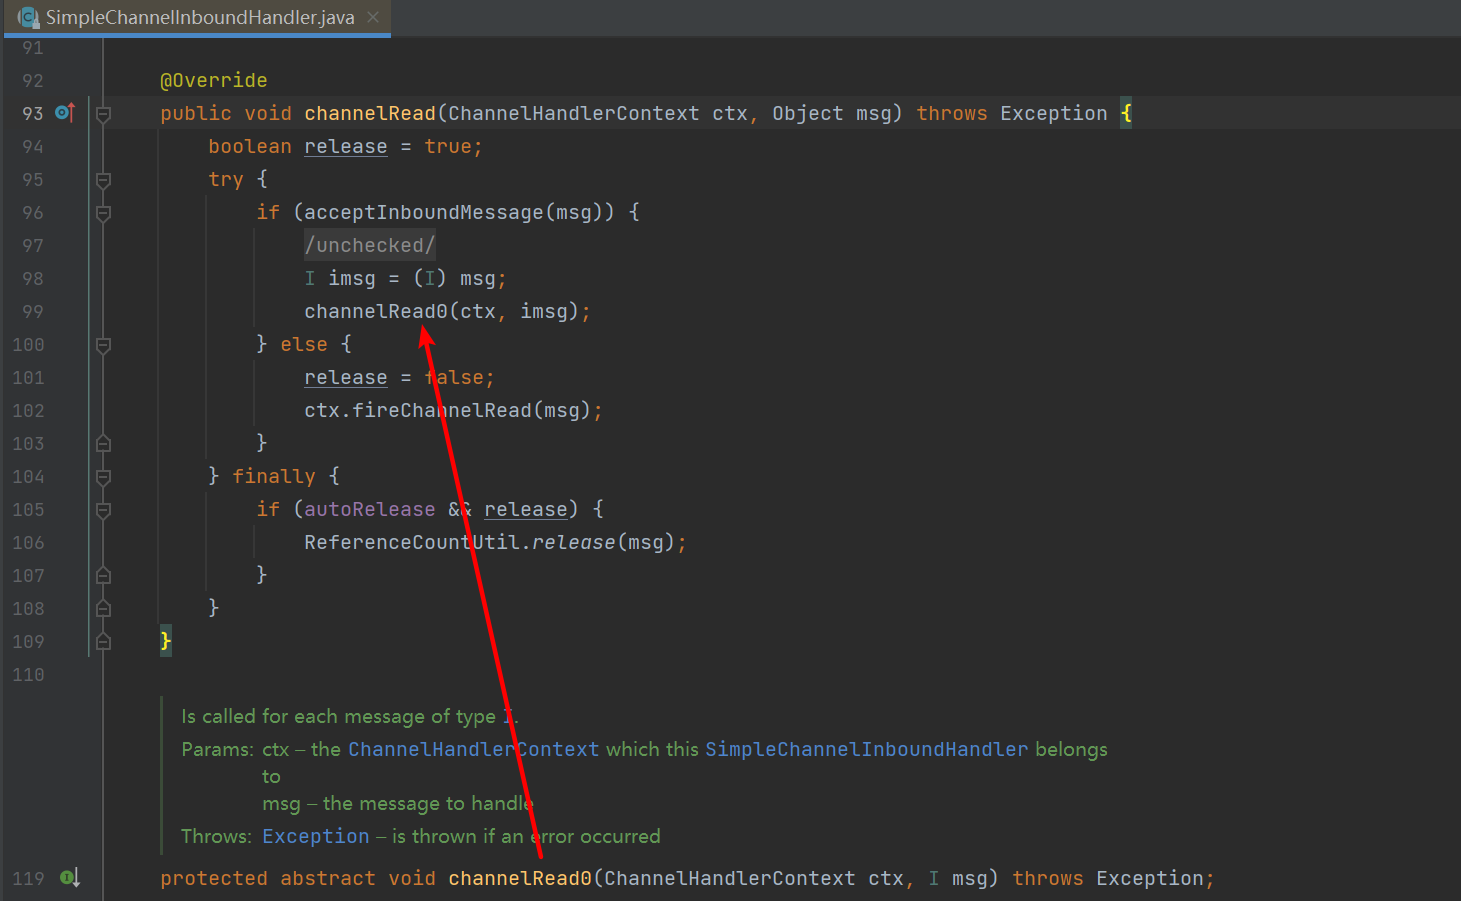
参考文献
[1] protobuf官方文档
[2] thrift官网
[3] grpc官网
[4] Netty零拷贝